Data Source Diff
Overview
Data Source Diff allows you to compare entire data sources or specific tables between different database instances. This is particularly useful for validating data migrations or ensuring consistency across environments.
Key Features
- Bulk Comparison: Compare multiple tables in one operation
- Filtering Options: Apply filters to focus on specific subsets of data
- Summary Diff: Get a high-level summary of differences between source and target
- Meta Diff: Compare table structures and metadata across data sources
- Data Diff: Verify row-level data consistency between source and target
- Export Diff Report: Export results as PDF/CSV/JSON for sharing or further analysis
How to Use SmartDiff Data Source Diff
Step 1: Open SmartDiff
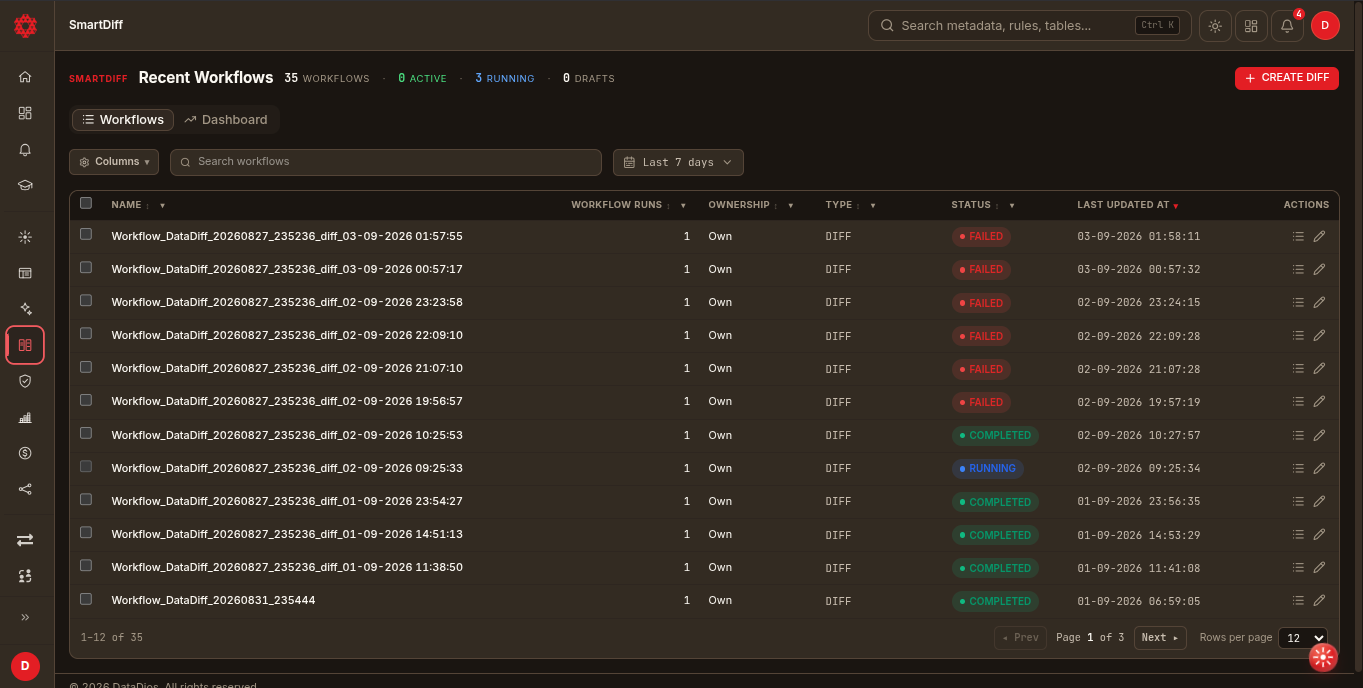
- Select SmartDiff from the left panel — this opens the Workflows list (the Dashboard tab next to it gives a cross-workflow rollup: counts, upcoming runs, trend, leaderboards)
- The list shows every saved workflow with its type, status, ownership, run count, and last updated time
Step 2: Create a New Diff Workflow
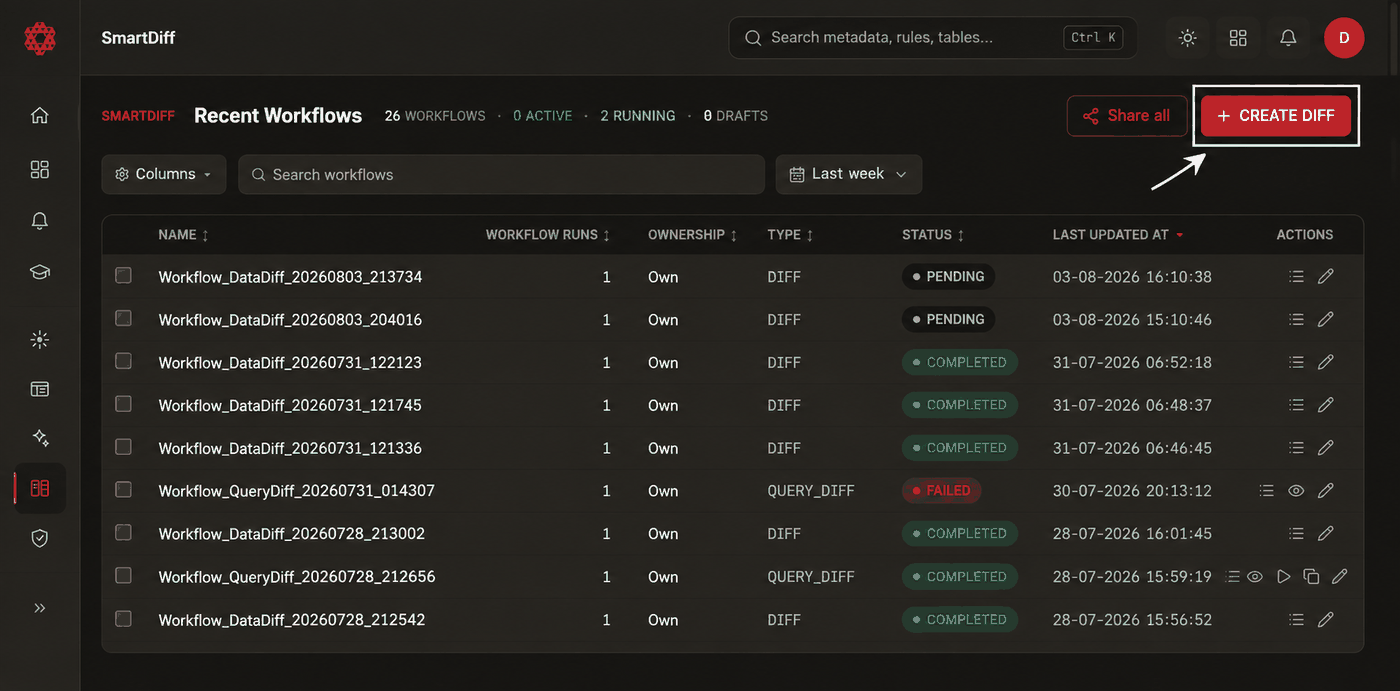
- Click + Create diff in the top-right of the Workflows list
- This creates a draft workflow and opens the editor directly — there's no separate "select data source" page
Step 3: Set Type, Source, Target, and Schedule
The editor opens with a compact metadata strip at the top:
- Type tabs — choose Data sources (the default), Query, or File
- Source / Target — pick the data sources to compare from the dropdown pickers
- Schedule — optionally set a cadence (Unscheduled / Hourly / Daily / Weekly / Monthly) from the dropdown, which shows the current cadence directly on its trigger. For Daily, Weekly, or Monthly, a time box appears next to the cadence to set the time of day the run starts, defaulting to 06:00
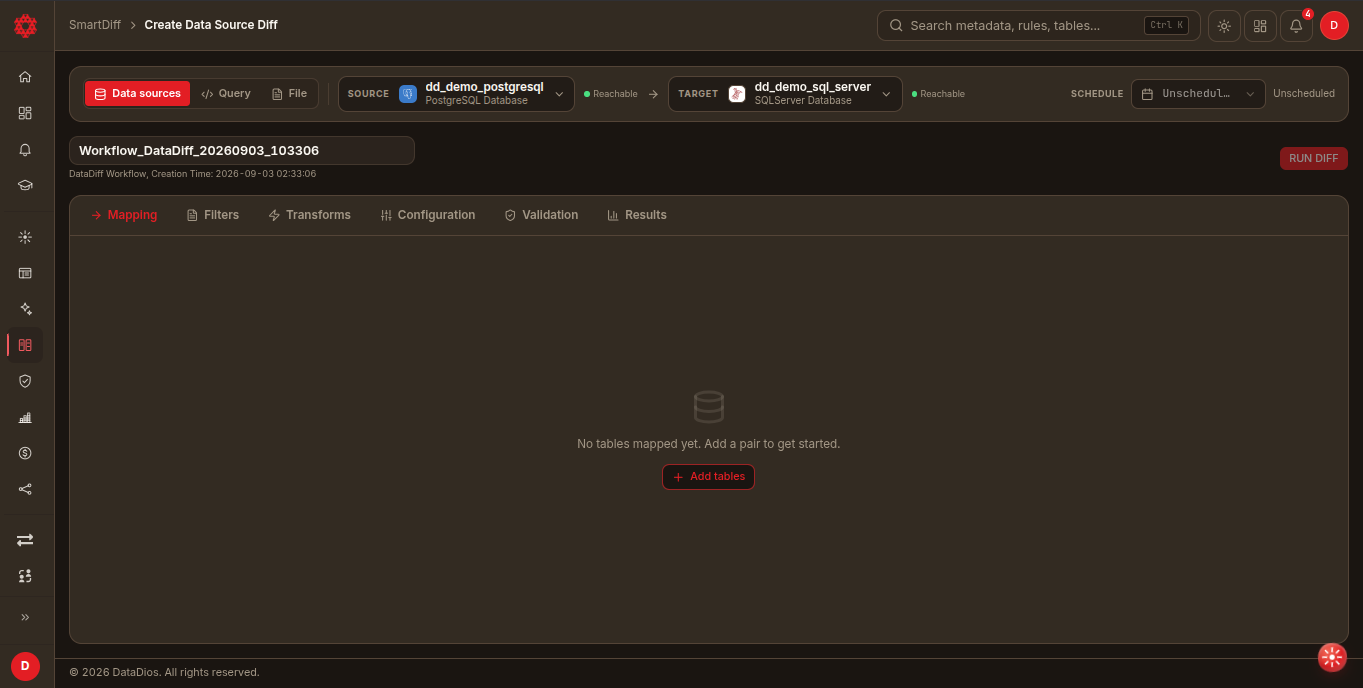
Everything you do from here on auto-saves — a small Saving… / Saved indicator sits next to the workflow name in the header, so there's no explicit "Next" or "Save" step.
Step 4: Map Tables and Columns
Open the Mapping tab (the default tab for a new workflow) — note the full six-tab bar (Mapping, Filters, Transforms, Configuration, Validation, Results) only appears for the Data sources type; Query and File workflows use a simpler four-tab flow without Filters or Transforms.
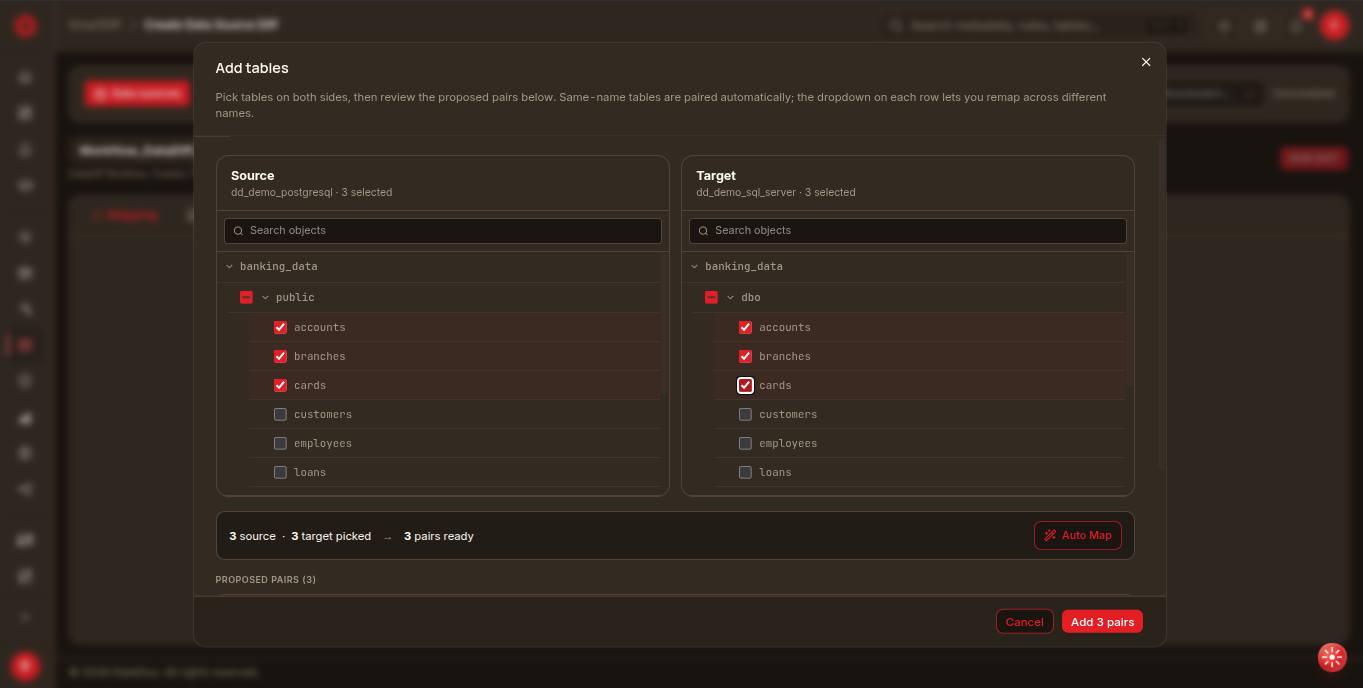
Click Add tables to open the bulk-add picker. It has a Source panel and a Target panel side by side, each with a search box and a checkbox tree of tables. Pick tables on both sides, then review the proposed pairs: same-name tables are paired automatically, and the dropdown on each row lets you remap across tables that don't share a name (e.g. customers ↔ clients). Click Cancel to back out, or Add N pairs to confirm.
Once tables are added, the Mapping tab becomes a master-detail layout:
- Left rail — every table pair you've added, with a status chip (
All/Needs attention/Clean/Unmapped) and search - Right pane — the column-mapping table for the selected pair. Toggle the key icon on a column to mark it as part of the comparison key. Columns the API found but that aren't paired yet appear in an Unmapped columns footer — pair them manually, use Accept all fuzzy for high-confidence name matches, or Auto-map remaining for exact name matches.
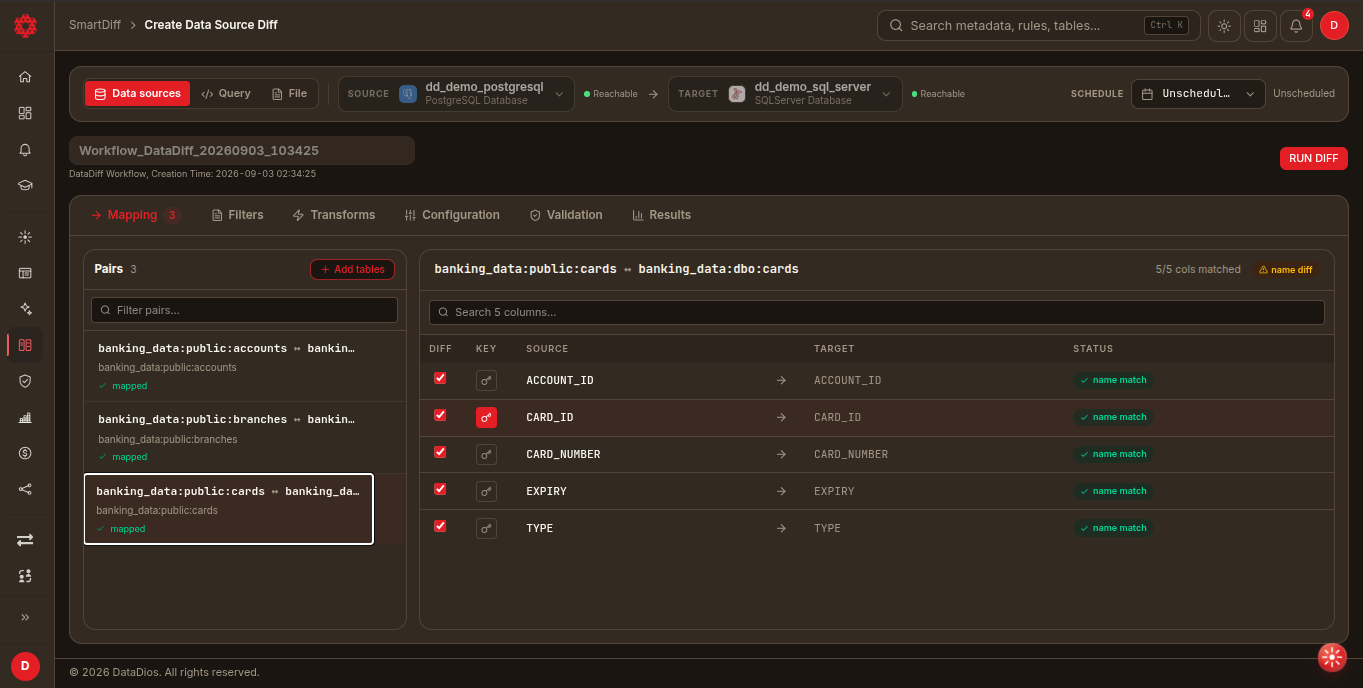
If a table has no primary key, mark a column (or set of columns) as key here — this replaces the old separate "configure key column" step. A Databricks table always needs this, because DataDios does not read primary keys from Databricks — see SmartDiff on Databricks.
Step 5: Filter and Transform (Optional)
- Filters tab — a SQL
WHEREclause editor for each side (source / target). Use AI suggest to draft a starting filter, or pick from the sample expressions card below the editors. - Transforms tab — reusable, named transformation rules that can apply to one or many mapped tables. Click Add transform, then fill in a name, description, and expression, choose which tables it applies to, and whether it runs pre or post diff. See Data Transformation for the full expression reference.
Filters and Transforms are only available on Data Source Diff workflows — Query and File workflows skip straight from Mapping to Configuration.
Step 6: Configure the Run
Open the Configuration tab — three cards:
| Section | Controls |
|---|---|
| Engine | Calculation engine, batch size, process in parallel, stream the diff |
| Summary | Enable/disable summary diff, summary type (Range / Histogram) |
| Storage | Enable/disable result storage, destination type, datasource, file format |
There is no separate save action here — every change auto-saves through the same indicator in the header.
Step 7: Review Validation
Open the Validation tab before running:
- A banner at the top shows the overall status — Validation passed, has warnings, or failed
- Below it, a pre-flight checks list itemizes each check (mapping completeness, key columns, filter syntax, etc.) with a pass/warning/danger icon
- Validation reruns automatically as you edit the workflow; resolve any danger checks before running
Step 8: Run the Diff
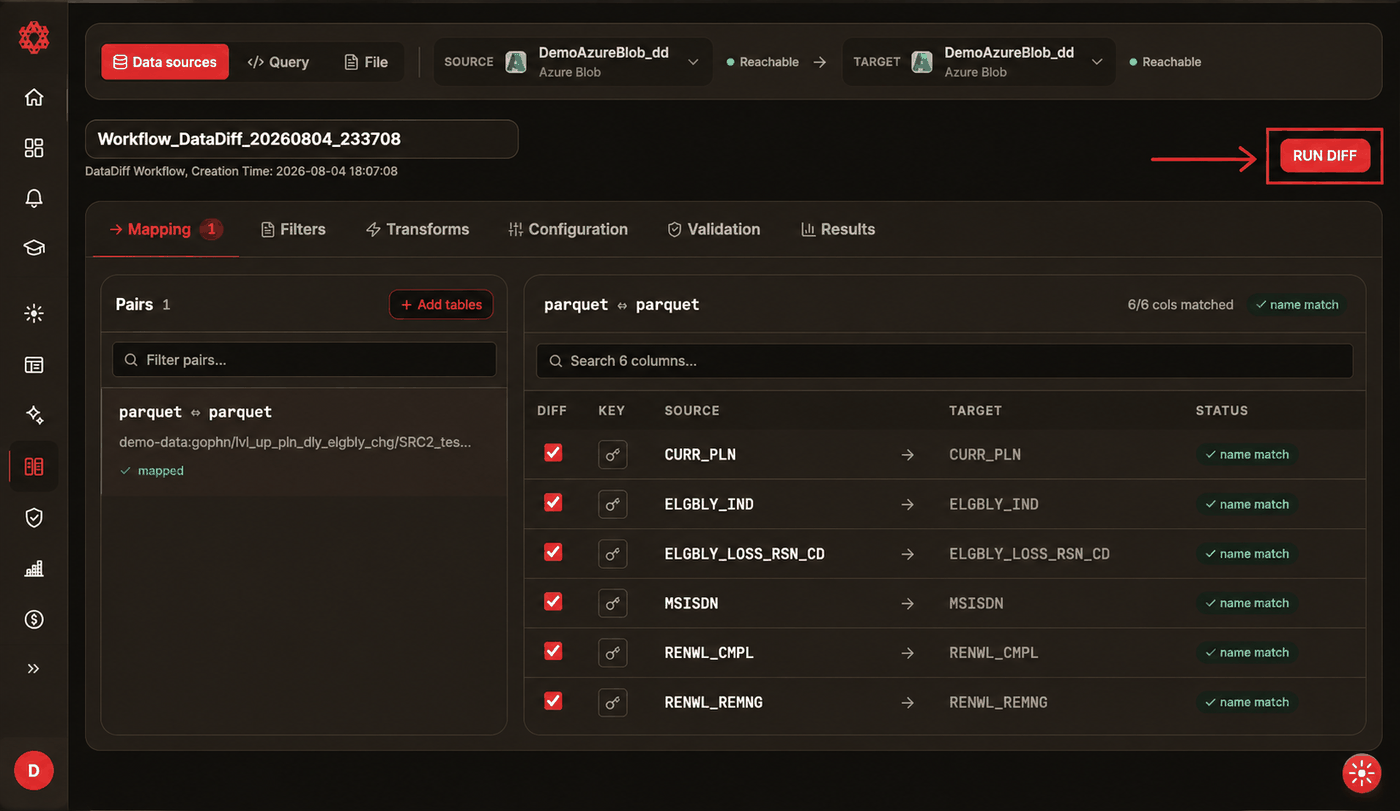
- Click RUN DIFF in the top-right of the header
- If validation is failing, the button routes you to the Validation tab instead of running
- The editor switches to the Results tab and stays on the same screen — the other tabs disable while the run is in progress, and the button shows Running…
Step 9: Read the Results
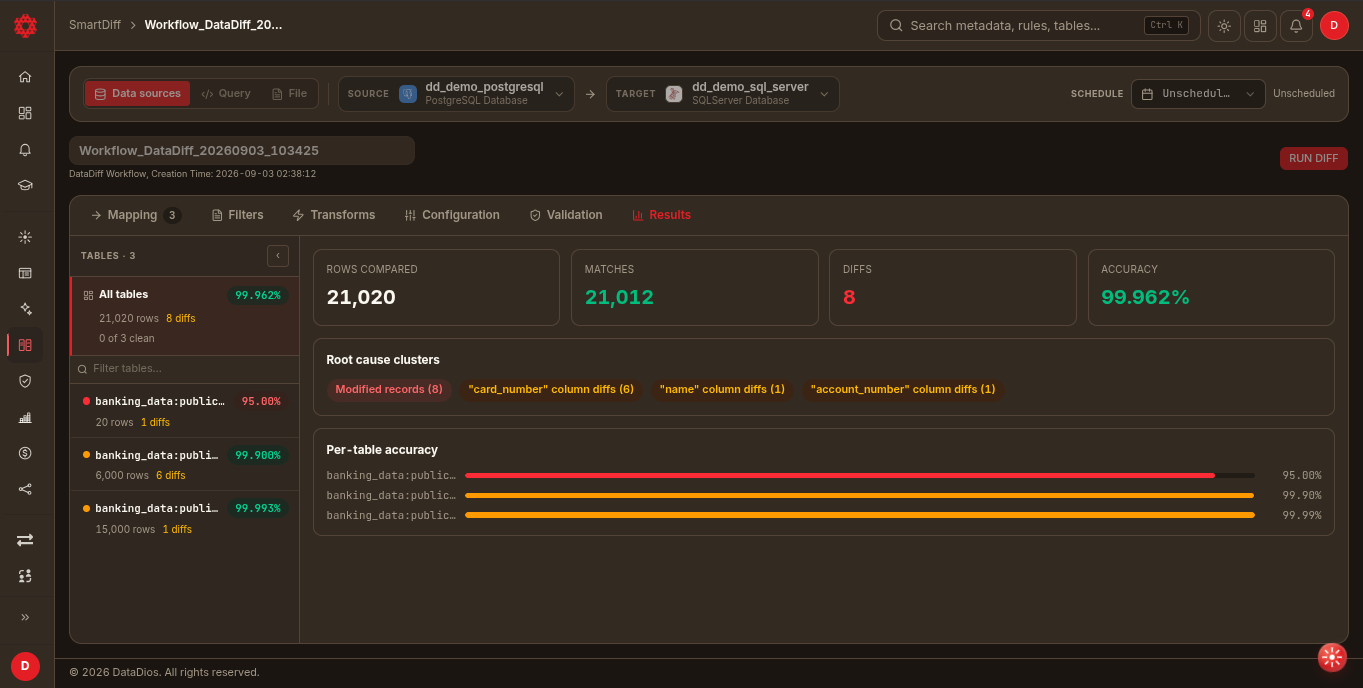
The Results tab shows the latest run. The left rail lists the workflow's tables, each with its own accuracy, row count and diff count, plus an All tables row at the top and a running N of M clean tally.
All Tables
With All tables selected in the left rail, the right pane shows:
- Stat cards: Rows compared, Matches, Diffs, Accuracy
- Root cause clusters: recurring difference patterns, tagged and counted (e.g.
Modified records (8),"card_number" column diffs (6)) - Per-table accuracy: a sorted bar list (lowest accuracy first) so you can triage the worst tables first
A Single Table
Click any table in the left rail to drill in. The detail pane has one chrome row (three sub-tabs on the left, search + Only diffs + PDF/CSV export icons on the right):
- Summary — per-column frequency distributions, with All data / Only diff and By source / By target toggles
- Meta Diff — schema differences (attributes, constraints, indexes) with source/target values highlighted
- Data Diff — row-level differences grouped into clusters (e.g. value mismatch, missing row, null, truncation, type cast, case, whitespace), with Side by side and Inline viewing
Comparison Modes
- Full Comparison: Leave Filters empty and Configuration's sampling settings off to compare every row and column
- Sample Comparison: Use the Filters tab's
WHEREclause (e.g. a date range orLIMIT-style predicate) to compare a representative subset — faster and less resource-intensive - Key-based Comparison: Mark one or more columns as key in the Mapping tab so rows are matched on identity rather than position
Best Practices
- Schedule comparisons during off-peak hours for large datasets (Schedule control in the metadata strip)
- Use the Filters tab to reduce load and focus on critical data
- Workflows auto-save — duplicate a well-configured workflow from the Workflows list instead of rebuilding filters and mappings from scratch
- Review the All tables insights before drilling into a specific table's Data Diff
- Keep transform expressions column-scoped — write the function call against the column value directly (
LOWER(email)), not the whole row - Use AI suggest on the Transforms tab as a starting point, then edit the generated expression to fit your exact scenario
- Escape regex carefully —
REGEXP_REPLACEpatterns follow standard regex syntax; double-check character classes like[^a-zA-Z0-9 ]
Troubleshooting
- Connection Timeouts: Check network/database connectivity for the source or target datasource
- Permission Issues: Ensure read access to required tables
- Performance Issues: Use sampling (Filters tab) or streaming (Configuration → Engine) for very large tables
- Transform expression errors: Check that the expression is valid SQL syntax and references the correct column name
- No transformation applied: Verify the column name matches exactly (case-sensitive), and that the transform's Applied to list includes the table you're checking