Query Diff Documentation
Overview
Query Diff in DataDios helps you validate data after migration by comparing query results from your source and target systems. This ensures that your data has been migrated accurately and consistently.
Stages of Query Diff
- Locate Query Diff in DataDios
- Create or import the required Data Sources
- Define and select Key Columns for verification
- Process the data sources
- View summary and compare differences
Steps to Perform Query Diff
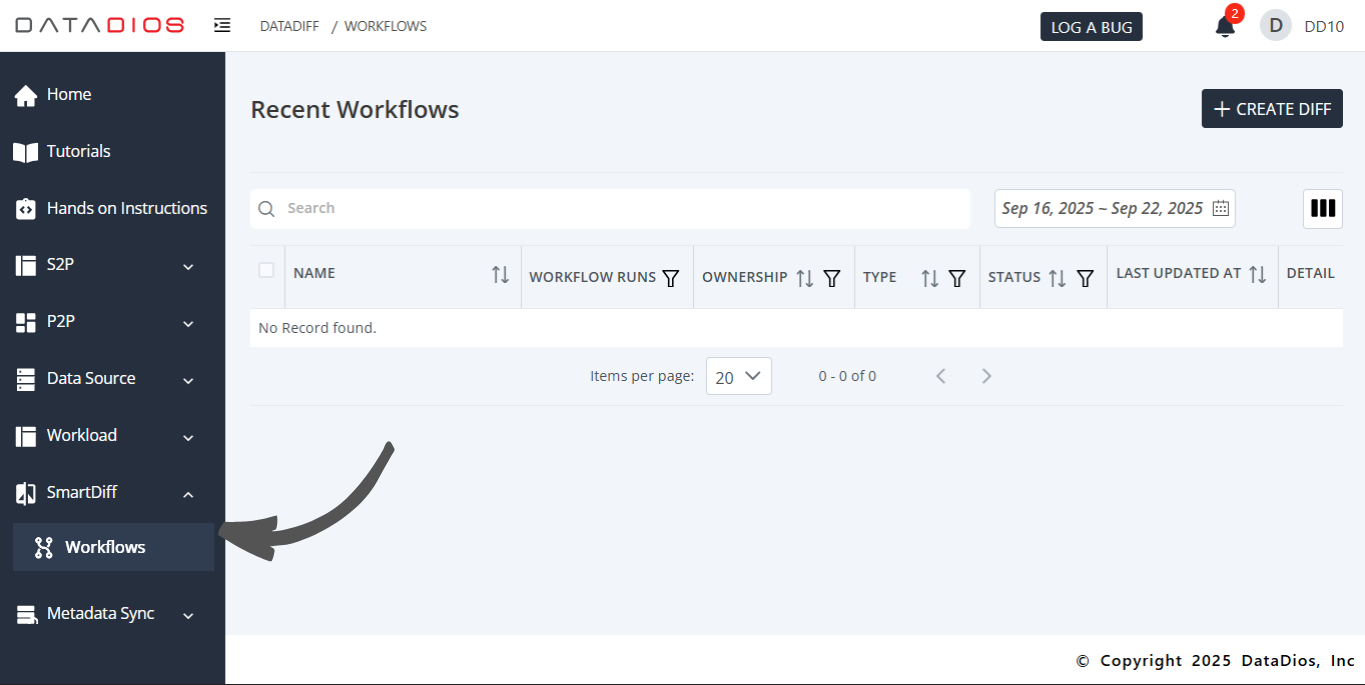
Step 1: Navigate to Query Diff
-
Go to the Smart Diff tab in DataDios
-
Click on Query Diff
-
Click Create Diff → This will open the Source and Target Data Source Selection page
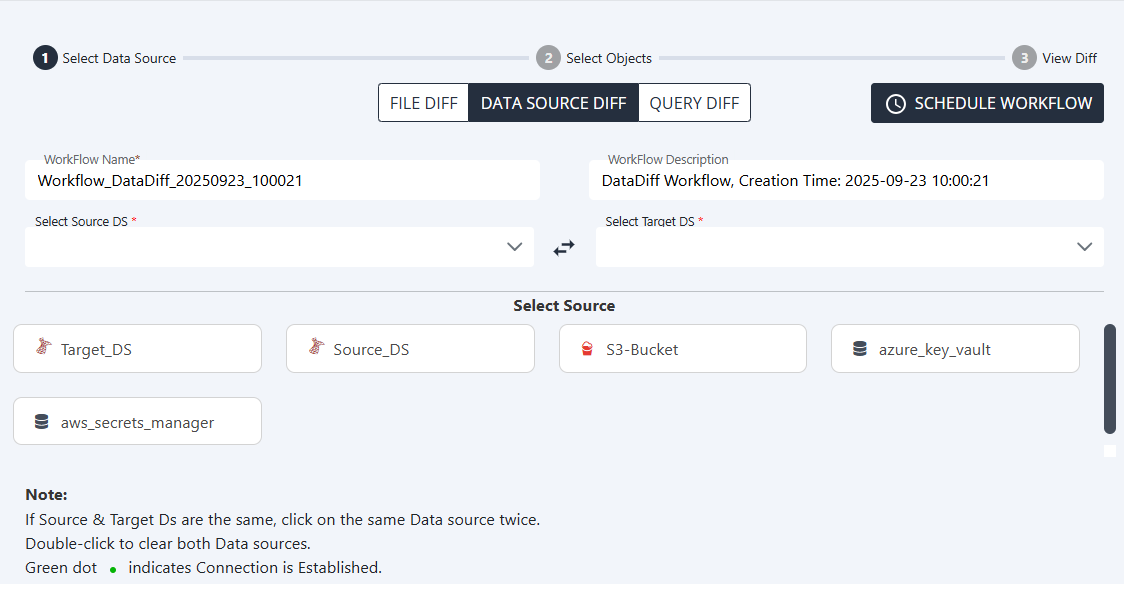
On this page, you can:
-
Switch from Datasource Diff (default) to Query Diff
-
-
Define your workflow name or diff job name
-
Add a description
-
Select Source and Target Data Sources
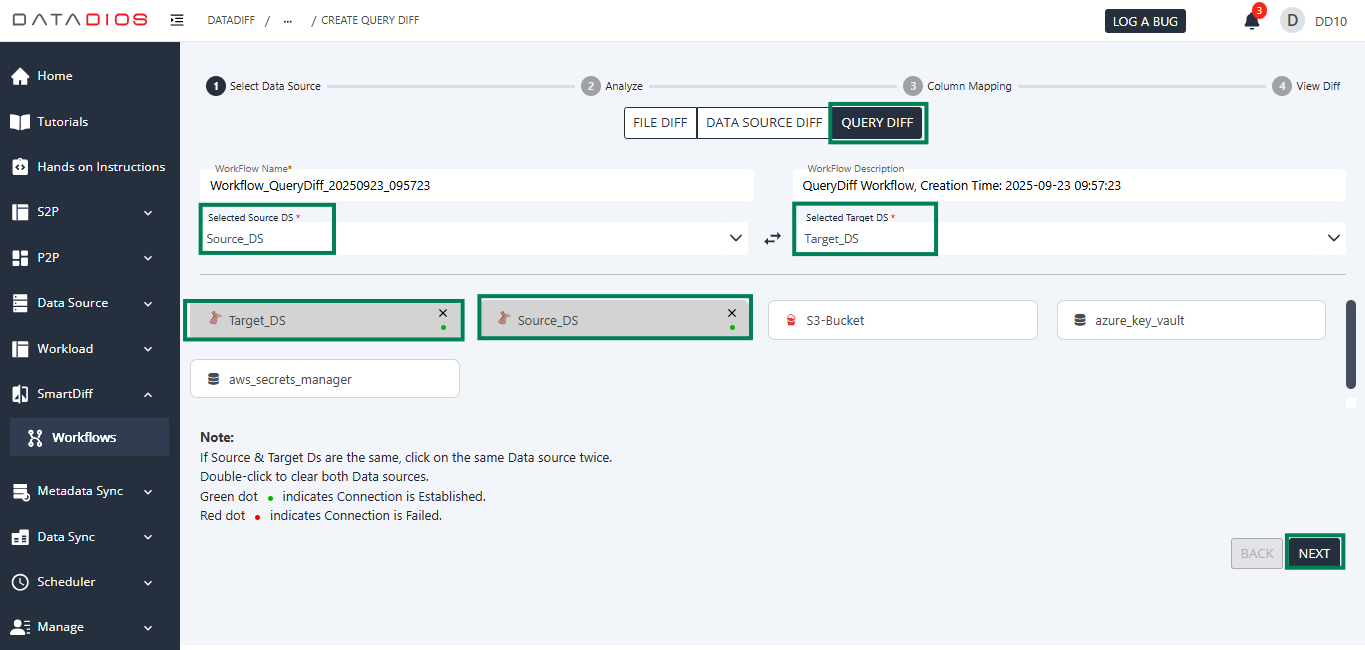
Step 2: Add Queries
-
Select your data sources and click Next
-
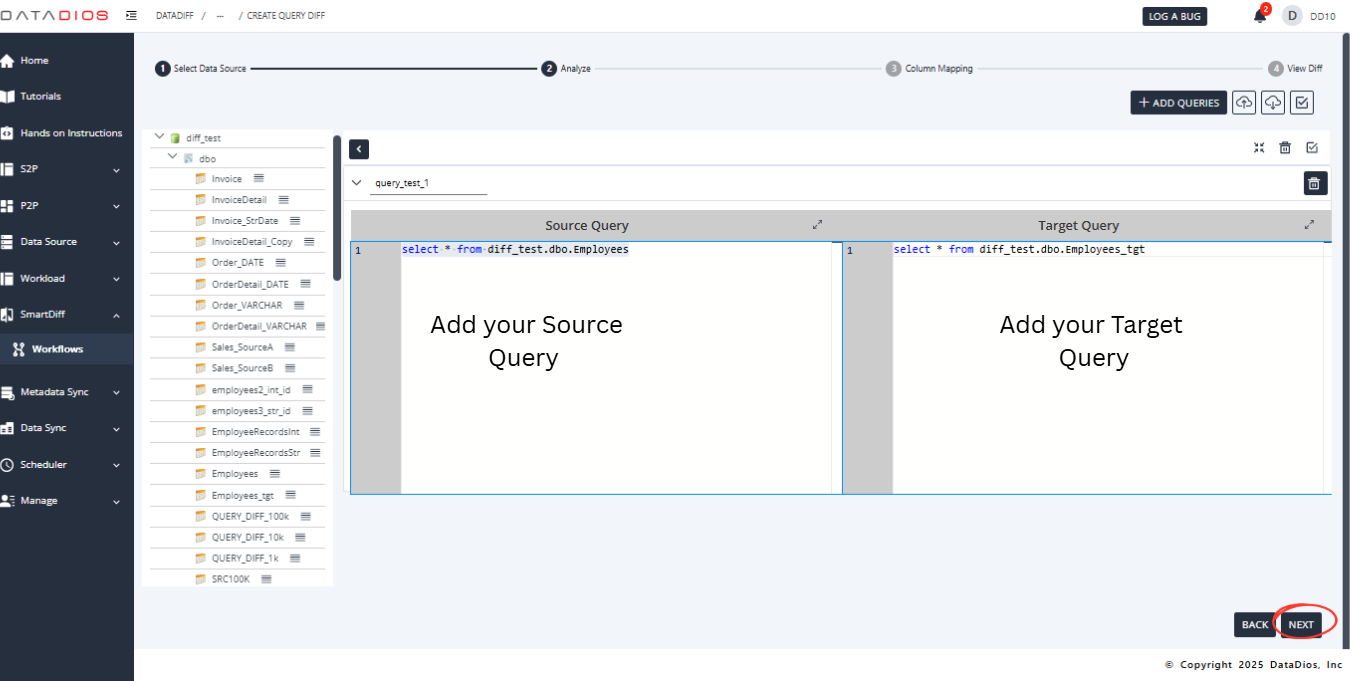
Add queries for both Source and Target
Ensure queries are validated before adding
-
Click Next
Step 3: Analyse Step
-
The Analyse step automatically maps matching columns between queries
-
Review the mapping
-
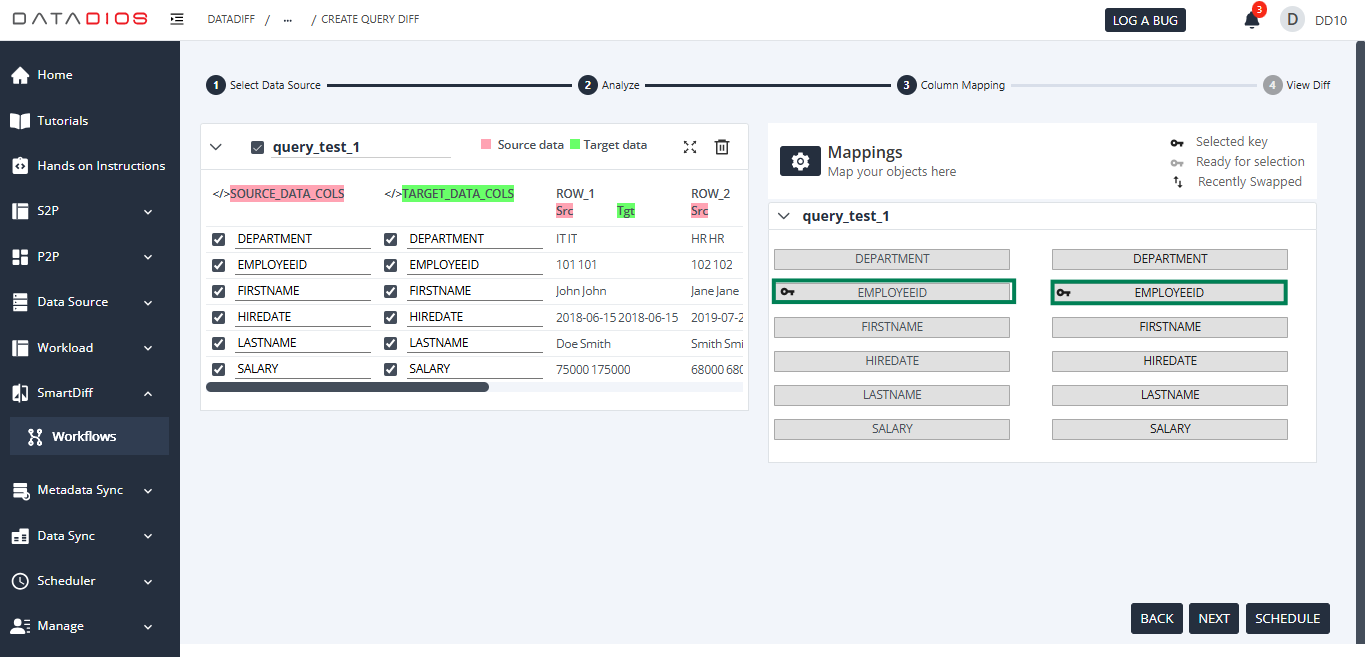
Select the Key Columns to be used in comparison
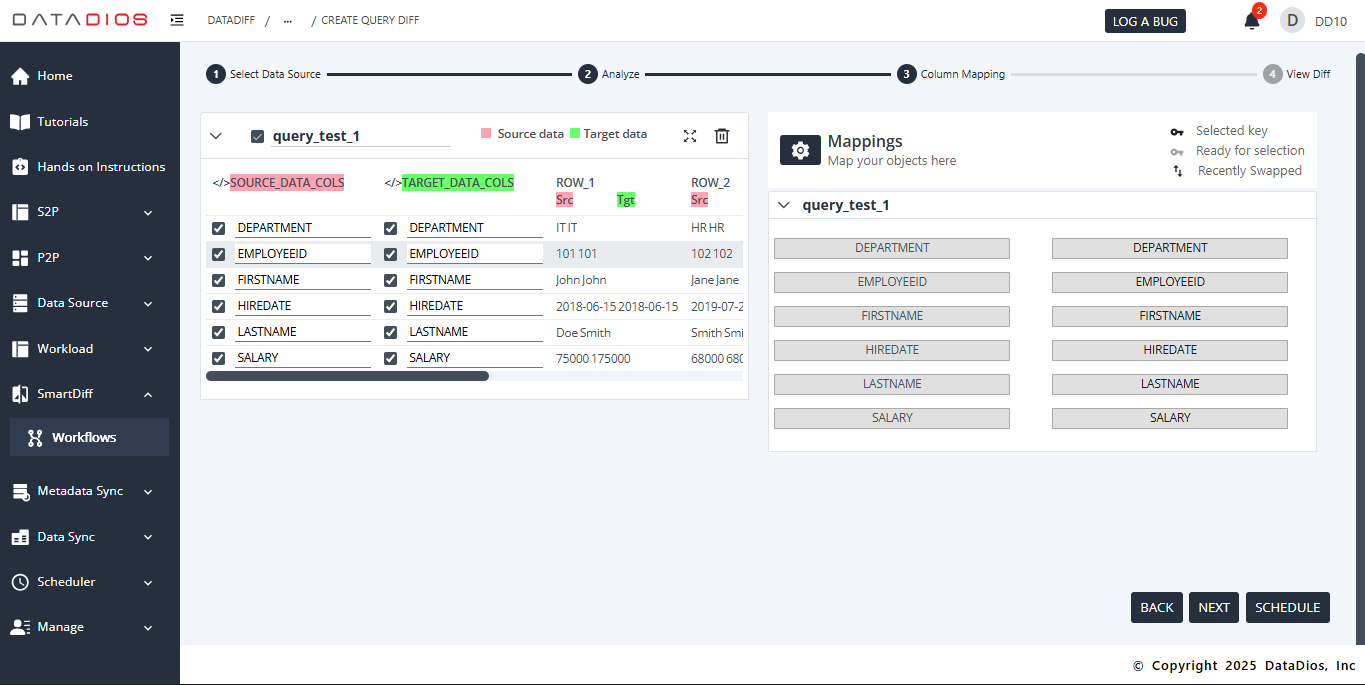
Step 4: Execute Stage
-
Select the Key Columns that may differ across the two data sources
-
(Optional) Schedule your workflow by clicking Schedule Workflow
-
Click Next to start execution and view diff results
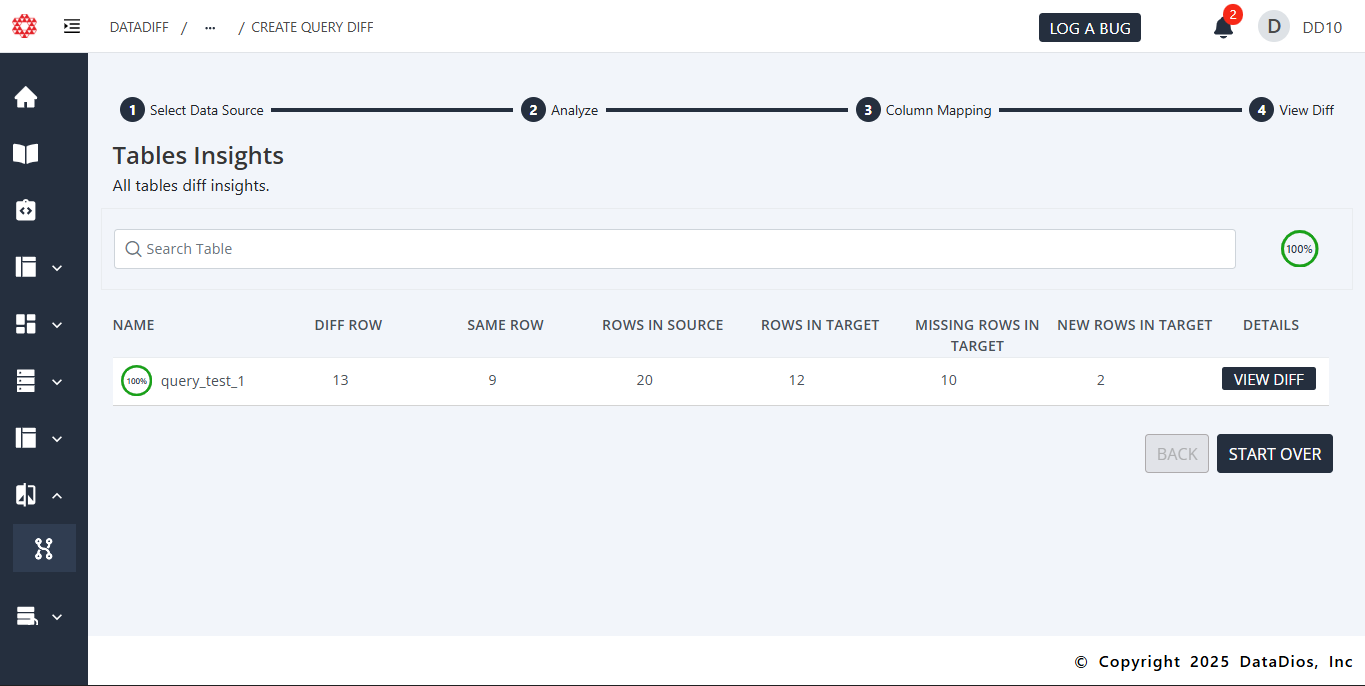
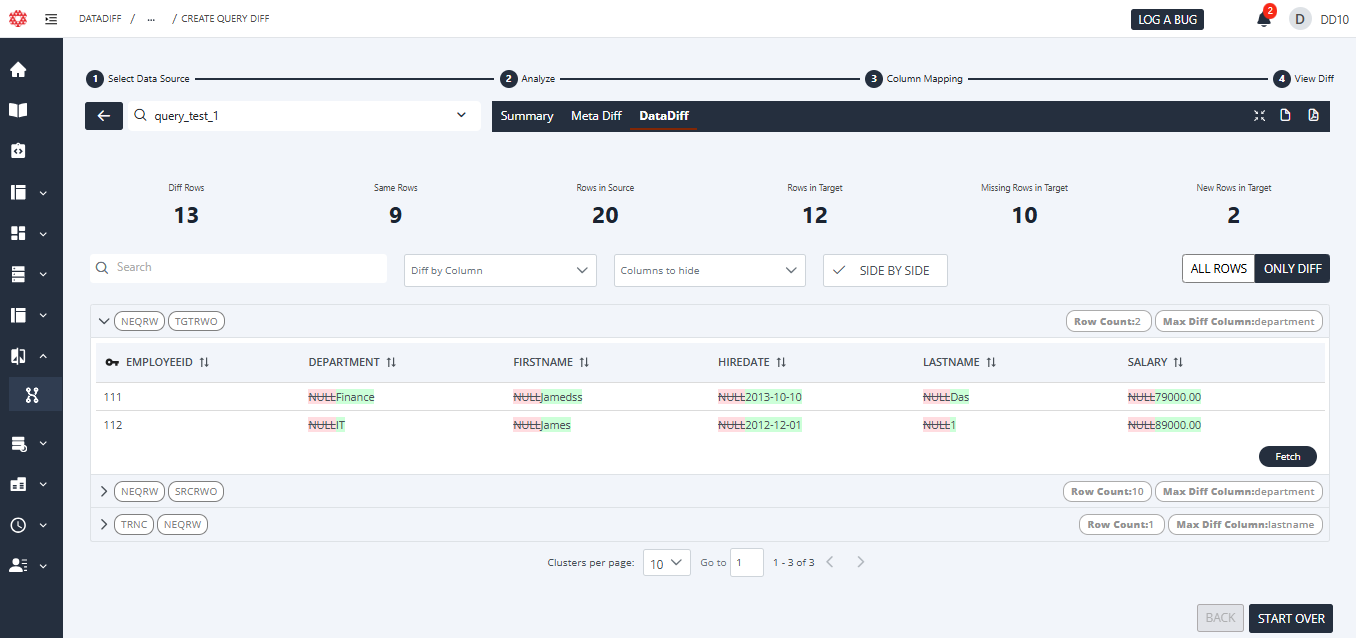
Step 5: Diff Summary
-
Wait for the diff process to complete (time varies by dataset size)
-
Once complete, review the Diff Overview
-
Click View Diff to explore detailed differences
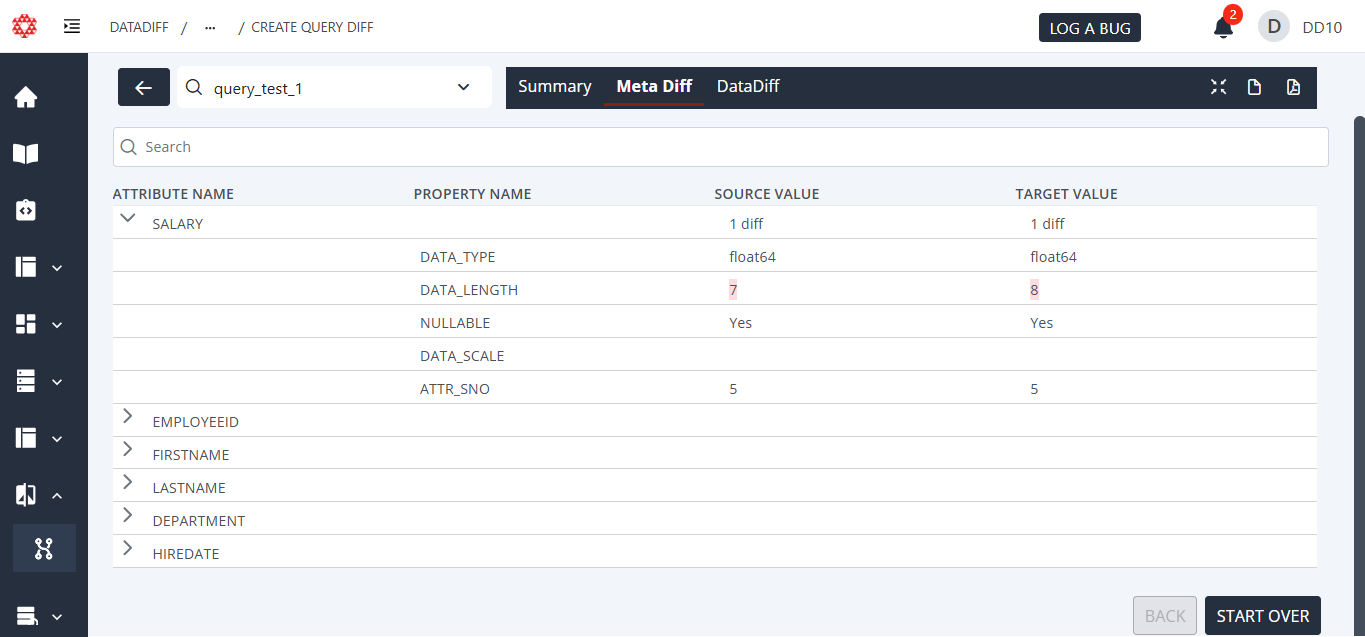
Types of Diffs:
-
Metadata Diff Shows differences between the structure (columns) of your queries
-
Data Diff Shows row-level differences in query results
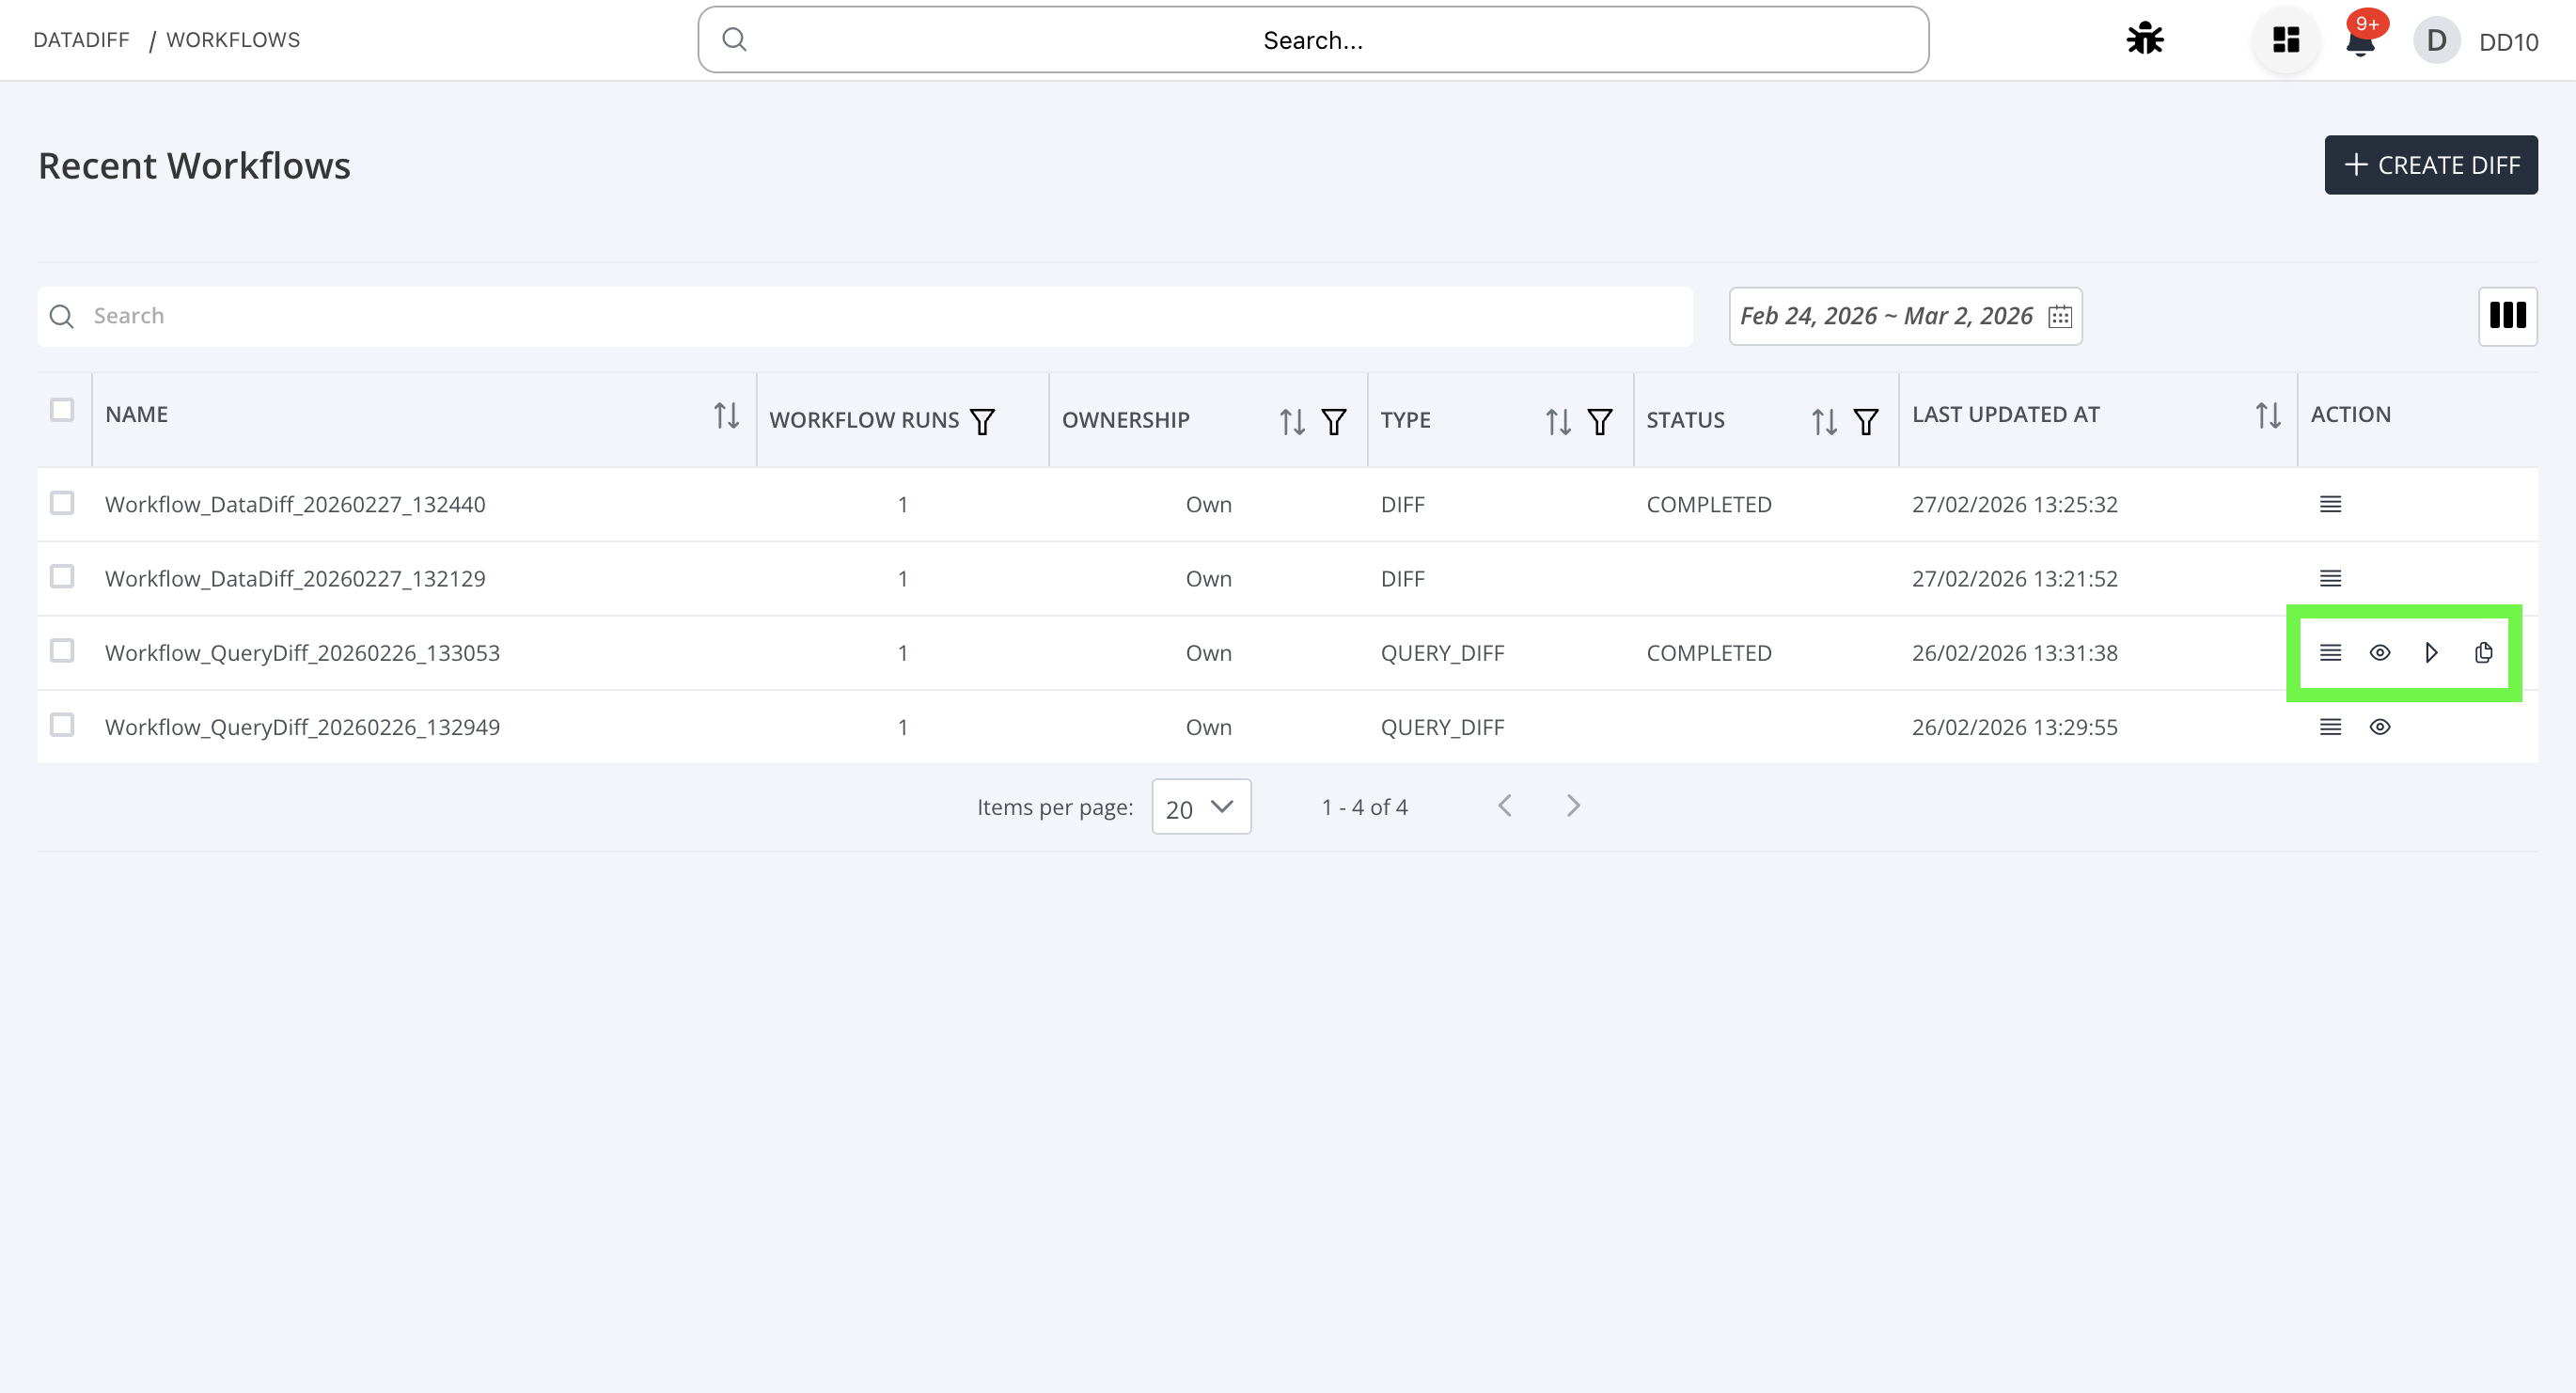
Workflow Actions
Once a Query Diff workflow has completed, three additional actions are available from the Workflows list page. These let you inspect, re-run, or duplicate any finished workflow.
Stepper Flow (Reference)
Every Query Diff workflow follows a 4-step process. The table below is referenced throughout the action descriptions.
| Step | Name | Purpose |
|---|---|---|
| 0 | Select Data Source | Choose source/target data sources, set job name |
| 1 | Analyze | Write or edit source/target SQL queries per pair |
| 2 | Column Mapping | Map columns between source and target, set keys |
| 3 | View Diff | Execute (or view) the diff and inspect results |
1. View Info
Icon: Eye Purpose: Inspect all details of a completed workflow without modifying anything.
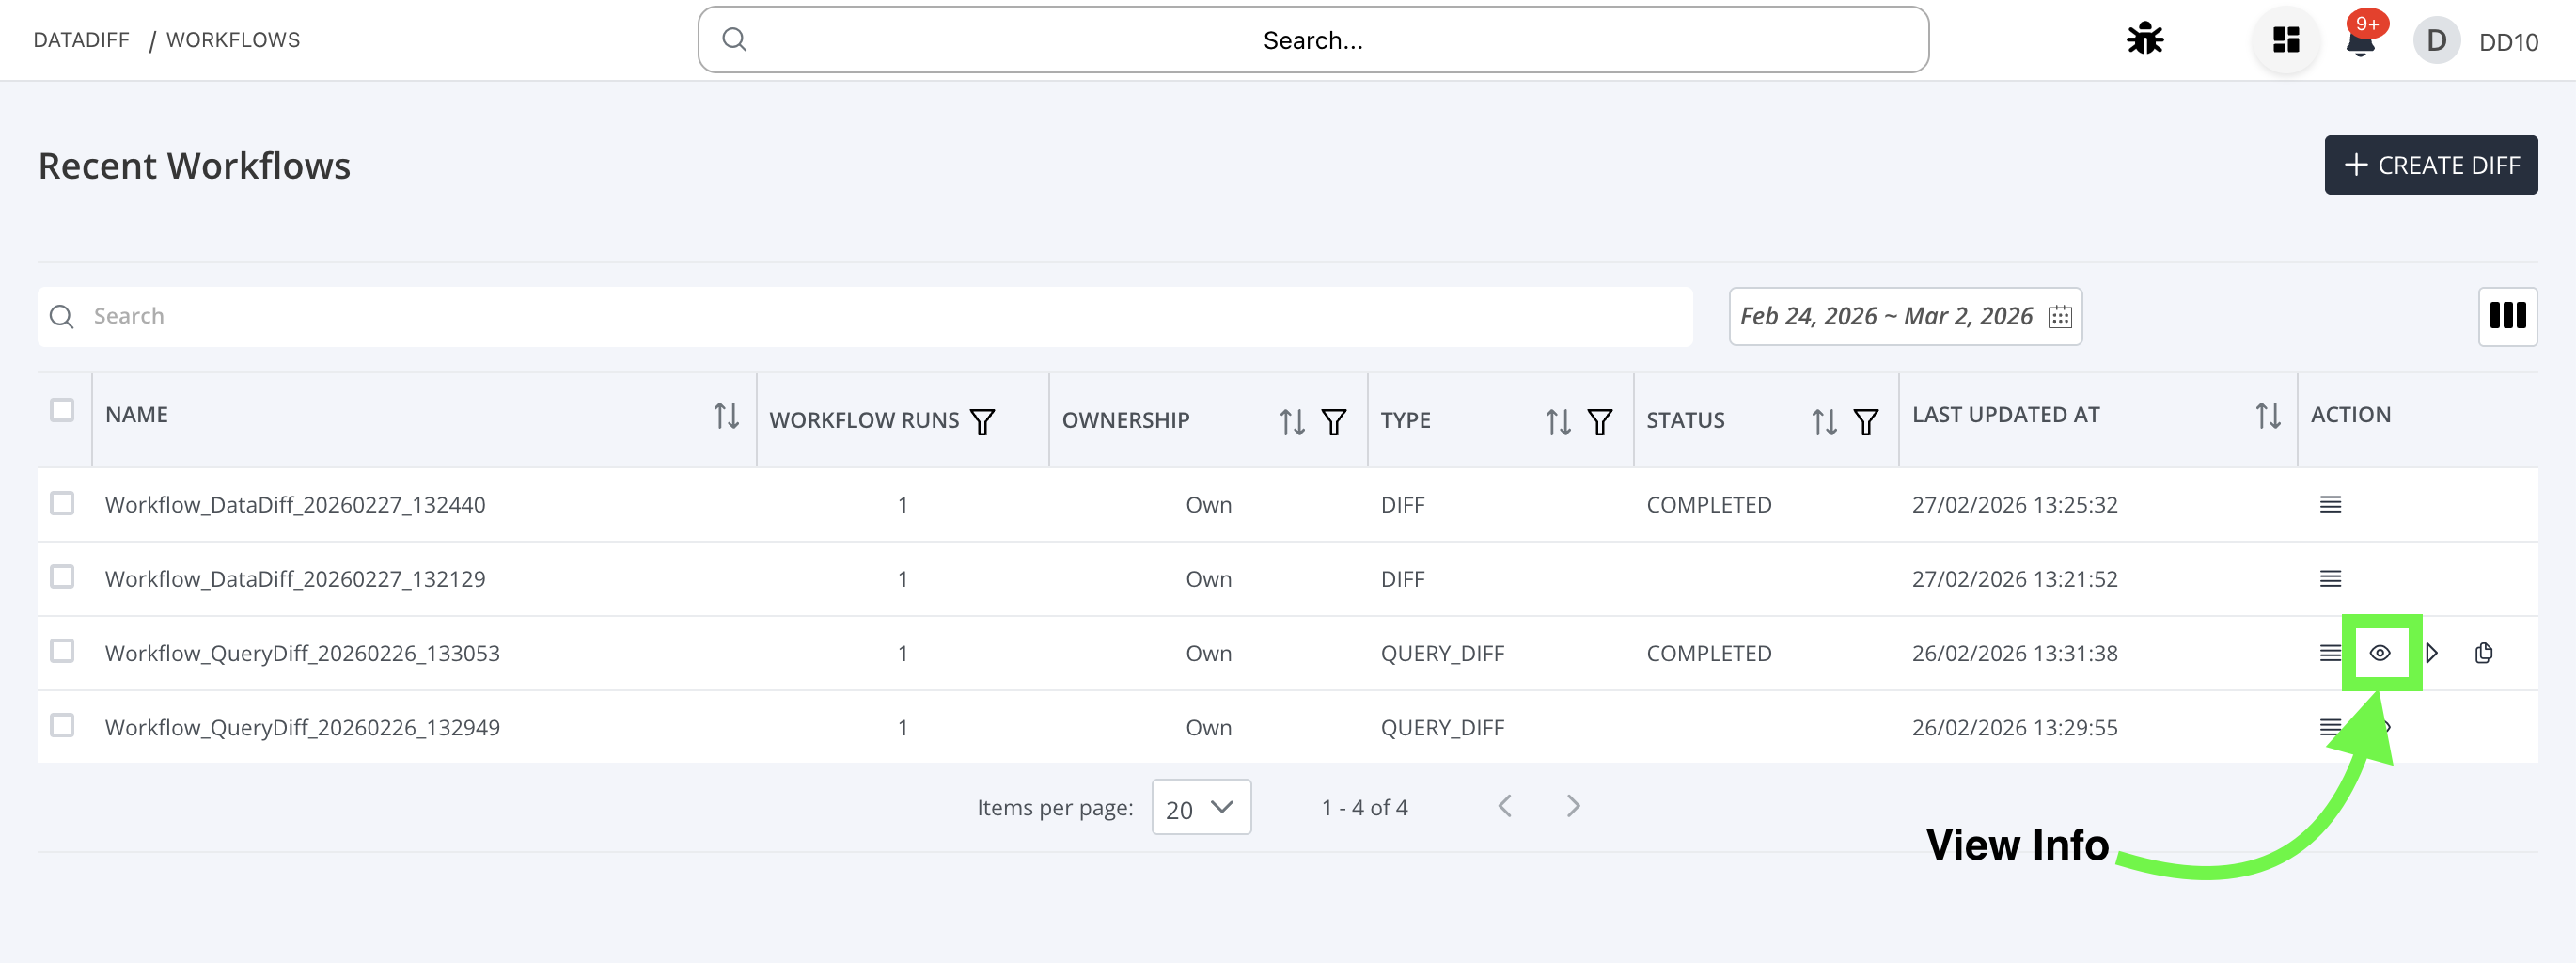
What Happens
- The system fetches the workflow's completed step data from the backend.
- Navigates to the Query Diff page with read-only permissions.
- The form renders in fully read-only mode — every input, dropdown, editor, and button is disabled.
Step 0 — Select Data Source
- Source and target data sources are displayed as selected but not changeable.
- Job name and description are shown but not editable.
- Connection test is skipped — connections are marked as "connected" automatically.
Step 1 — Analyze
- Source and target SQL queries are shown in the editor, not editable.
- The sidebar displays data source names as plain text instead of the interactive object tree.
- Queries cannot be added, removed, or modified.
- Hovering over disabled elements shows: "This query is view only. Update access is not available."
Step 2 — Column Mapping
- Column mappings and primary key selections are displayed from cached results.
- No API call is made to re-analyze queries — data comes from the stored step results.
- Columns, keys, and query pair names are all non-editable.
Step 3 — View Diff
- Diff results are fetched from stored data, not re-executed.
- No "Stop" button is shown.
- Summary and detailed diff views are available for browsing.
Navigation
- Forward: The "Next" button advances through steps up to the number of steps that were actually completed in the original workflow. You cannot advance beyond what was completed.
- Backward: The "Back" button is enabled for steps 1, 2, and 3.
- No "Start Over": Once you reach the last completed step, the Next button is disabled.
2. Run Details
Icon: Play Purpose: Re-run the diff for a completed workflow using its existing configuration.

What Happens
- The system fetches the workflow's completed step data.
- A new sync workflow is created on the backend, linked to the original workflow.
- The user lands directly on Step 3 (View Diff) — Steps 0–2 are skipped entirely.
Steps 0–2 (Skipped)��
- The component jumps directly to Step 3.
- Steps 0, 1, and 2 are not rendered or visited.
- The Back button is disabled (cannot go back to earlier steps in sync mode).
Step 3 — View Diff (Active)
- Diff execution starts automatically — both metadata and async diff trigger on load.
- A progress bar appears, updating every few seconds with per-query-pair completion percentages.
- Interactive elements:
- Query pair selector: Click any pair to see its detailed diff.
- Stop button: Halts the running diff and marks the workflow as "STOPPED".
- Summary/Detail toggle: Switch between the overview table and per-pair cluster diff view.
- On reaching 100% completion, the workflow is automatically marked as "COMPLETED".
After Completion
- The "Start Over" button navigates back to the workflows list.
- The Schedule button is hidden for sync workflows.
Key Behavior
- A new workflow is created each time "Run Details" is clicked — the original workflow is not modified.
- The new workflow copies source/target data sources, queries, column mappings, and primary keys from the original.
- The job name is the new sync workflow's auto-generated name.
3. Copy Details
Icon: Copy Purpose: Create a new workflow pre-filled with an existing workflow's configuration, allowing full editing before execution.

What Happens
- The system loads data sources and fetches completed step data from the original workflow.
- Extracts queries, column mappings, primary keys, and data source configuration.
- Navigates to the Query Diff creation page — no read-only flags.
- The user starts at Step 0 with all fields pre-filled but fully editable.
Step 0 — Select Data Source
- Source and target data sources are pre-filled from the original workflow. Connection tests run automatically.
- Job name is a new auto-generated name (e.g.,
Workflow_QueryDiff_YYYYMMDD_HHmmss), not the original's name. - Job description is also freshly generated.
- Everything is editable — the user can change data sources, name, and description.
- Clicking "Next" creates a new workflow on the backend.
Step 1 — Analyze
- Queries are pre-filled from the original workflow (source SQL, target SQL, pair names).
- The sidebar shows the full interactive object tree for both data sources.
- Queries are fully editable — add new pairs, remove existing ones, modify SQL.
- The sidebar object list loads but does not overwrite the pre-filled queries.
Step 2 — Column Mapping
- The system makes a real API call to analyze the queries and get fresh column data.
- Column mappings and primary keys from the original workflow are pre-loaded and preserved.
- Everything is fully editable — change column selections, primary keys, pair names, or delete pairs.
- The Schedule button is available at this step.
Step 3 — View Diff
- Full diff execution runs (metadata + async diff).
- All interactive features are available: progress tracking, stop, summary/detail views.
- "Start Over" resets the form to Step 0 for a new workflow.
How It Differs from a Fresh Workflow
| Aspect | Copy Details | Fresh Workflow |
|---|---|---|
| Source/Target DS | Pre-filled, connection auto-tested | Empty — must select manually |
| Queries | Pre-filled from original | Empty default placeholder |
| Column Mapping | Pre-loaded keys and column selections | Empty — populated after analysis |
| Job Name | New auto-generated name | New auto-generated name |
| Starting Step | Step 0 (same) | Step 0 |
| Object list behavior | Loads list but preserves copied queries | Loads list and auto-fills queries |
Comparison Summary
| Aspect | View Info | Run Details | Copy Details |
|---|---|---|---|
| Starting Step | 0 | 3 | 0 |
| Read-Only | Yes (all steps) | No (step 3 only) | No (all steps editable) |
| Creates New WF | No | Yes (sync workflow) | Yes (at step 0 → 1) |
| API Calls | None (cached data) | Full execution | Full execution |
| Queries | View only | From original (not shown) | Pre-filled, editable |
| Column Mapping | View only | From original (not shown) | Pre-filled, editable |
| Diff Execution | View stored results | Auto-executes | Manual (step 3) |
| Schedule | Not available | Not available | Available at step 2 |
| Stop Button | Hidden | Available | Available |
| Navigation | Forward up to completed steps, back enabled | Step 3 only, no back | Full forward/back |
Best Practices
- Create Data Sources first: Always configure and test your source and target before running Query Diff
- Validate queries: Ensure SQL queries are correct and return expected results
- Choose Key Columns wisely: These should uniquely identify rows to ensure accurate comparison
- Use scheduling (if required): Automate query diff execution for repeated validation tasks
- Use View Info for auditing: Quickly inspect a completed workflow's configuration without risk of modifying anything
- Use Run Details for re-validation: Re-execute a diff after upstream data changes without reconfiguring from scratch
- Use Copy Details as a template: Duplicate a well-configured workflow and tweak only what's needed for a similar comparison