DataDios User Profile
Overview
The User Profile section in DataDios provides users with comprehensive access to their account information, configuration settings, and account management features. This guide covers all aspects of profile management, from viewing personal information to updating configurations and managing account.
Accessing Your Profile
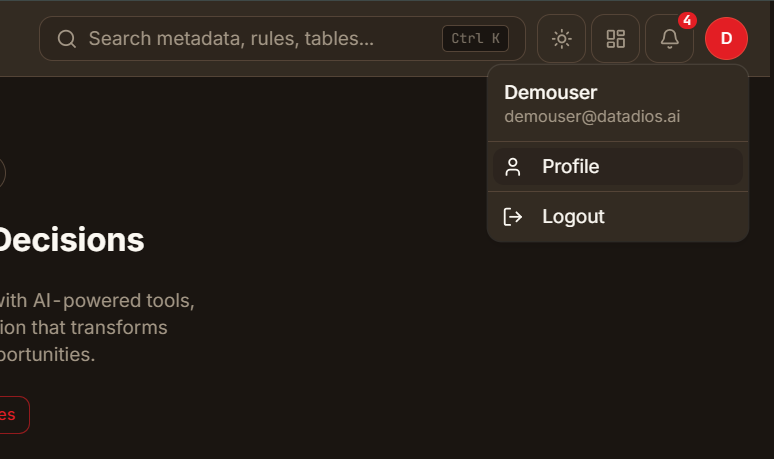
- Login to DataDios: Navigate to
https://prod.datadios.com/and log in with your credentials - Locate User Icon: Look for your user avatar and username in the top-right corner of the screen
- Open Dropdown: Click the user avatar to open a dropdown menu
- Select Profile: Click on "Profile" from the dropdown options
Profile Information Display
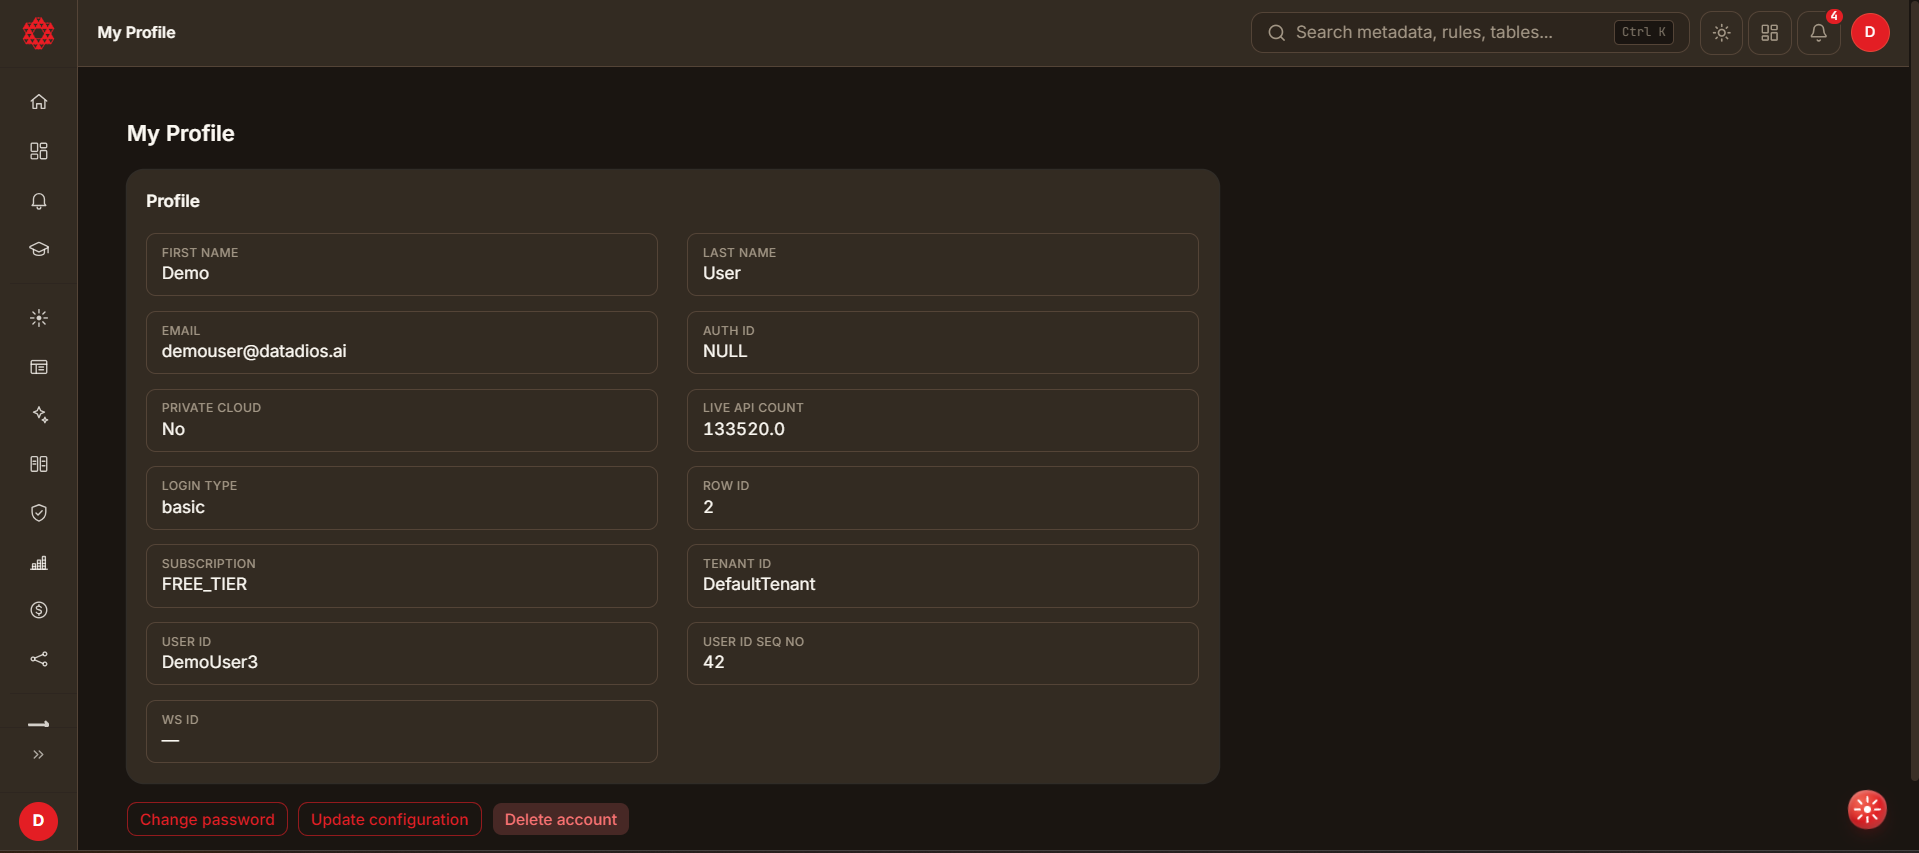
The profile page shows your account information in a single Profile card, laid out as a grid of individual fields:
Profile Fields
- User ID: Unique system identifier (e.g., "JhonDoe57")
- Email: Primary email address (e.g., "jhon.doe@datadios.ai")
- First name: User's first name (e.g., "Jhon")
- Last name: User's last name (e.g., "Doe")
- Email verified: Whether your email address has been confirmed ("Yes"/"No"). When it shows "No", a Verify email button appears next to it — see Verifying Your Email below. This field (along with Organisation) is only shown on deployments that have email verification enabled.
- Tenant ID: Organization/tenant identifier (e.g., "DefaultTenant")
- Private cloud: Cloud deployment status ("Yes"/"No")
- Login type: Authentication method (e.g., "basic")
- Auth ID: Populated only for accounts that log in through an external identity provider (SSO/OAuth, e.g. Azure AD) — for Azure it reflects the provider's tenant ID. Shows as "NULL" for regular username/password accounts; this is expected, not an error.
- Row ID, Ws ID (Workspace ID), User ID Seq No: Additional account identifiers shown for reference (displayed as "—" if not applicable)
Verifying Your Email
If your email hasn't been verified yet, the Email verified field shows "No" with a Verify email button next to it:
- Click Verify email. DataDios sends a one-time verification code to your registered email address.
- An "Enter verification code" dialog opens automatically, showing "We sent a code to <your email>."
- Enter the code in the Verification code field.
- Click Verify to confirm, or Cancel to close the dialog without verifying.
- On success, a confirmation message reads "Email verified" and the Email verified field updates to "Yes".
This flow is only available when email verification is enabled for your deployment.
Profile Management Features
1. Update Configuration
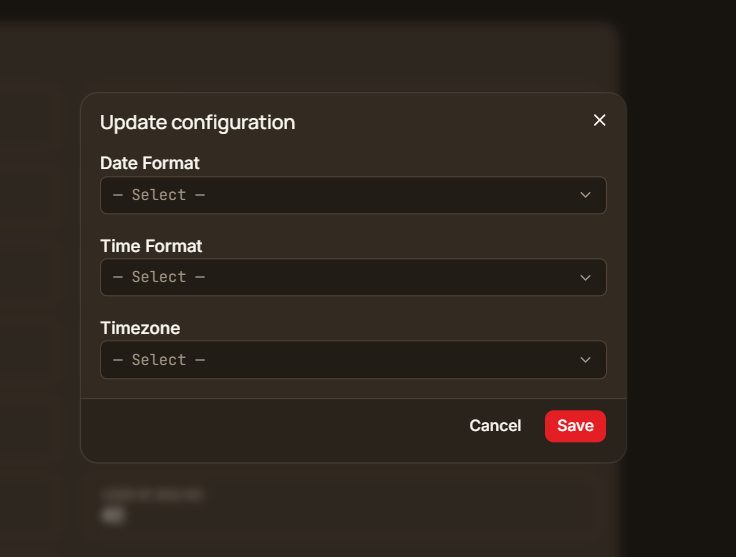
The "Update configuration" button lets you customize your personal preferences:
Available Settings:
- Date Format: Choose between different date display formats
- Default: MM/DD/YYYY
- Options: Various international date formats ("YYYY/MM/DD", "DD/MM/YYYY")
- Time Format: Select time display preference
- Default: HH:mm:ss
- Options: 12-hour or 24-hour formats
- Timezone: Set your local timezone
- Default: UTC
- Options: All major timezones worldwide ("PST", "EST" etc)
How to Update Configuration:
- Click the Update configuration button below the Profile card
- Modify your preferred settings in the configuration dialog
- Click Save to save changes
- Click Cancel to discard changes
2. Change Password
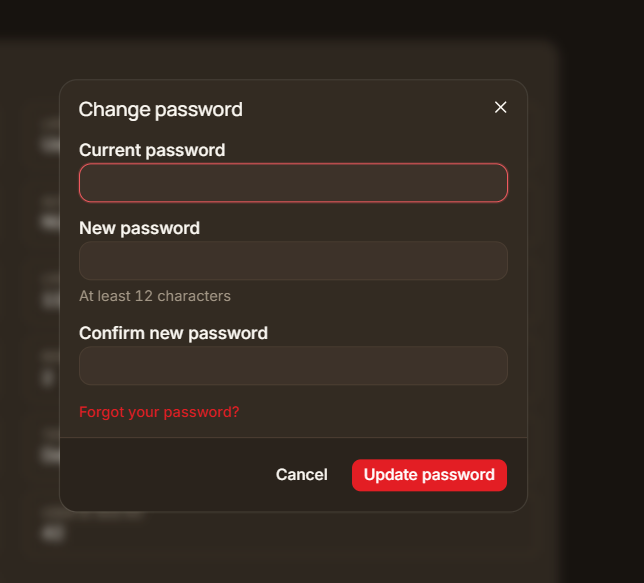
The "Change password" button opens a dialog for secure password management:
Password Change Process:
- Click the Change password button below the Profile card
- Enter your current password in the Current password field
- Enter your new password in the New password field
- Confirm your new password in the Confirm new password field
- Click Update password to save the new password, or Cancel to close the dialog
Security Features:
- Password Validation: Ensures the new password meets the password policy and differs from your current password
- Confirmation Field: Shows an error if the new and confirm passwords don't match
- Old Password Verification: Confirms your identity before allowing the change
- Forgot your password? Link: If you don't know your current password, click this link to verify your identity with a one-time code sent to your email, then set a new password directly — without needing your old one
If you log in via SSO (e.g. Azure AD), you don't have a password to enter here — use Forgot your password? instead of the current-password field to set one via email verification.
3. Account Deletion
The "Delete account" button opens a dialog for account removal:
Account Deletion Process:
- Click the Delete account button below the Profile card
- If your account owns or shares workflows, deletion is blocked — see below
- Otherwise, enter your account password to confirm and click Delete
Account Deletion Rules:
- Shared Resources Check: The system checks whether your account owns or has shared workflows
- Deletion Prevention: Accounts with shared/owned workflows can't be deleted — you'll be asked to have an admin reassign them, or to disable the account instead
- Disable Option: Admins can click Disable account as an alternative to deletion when resources are shared
- Forgot your password? Link: Available in the deletion dialog if you don't remember your password — verifies your identity via a one-time code before letting you continue. If you log in via SSO, use this link too — you don't have a password to enter otherwise
- Last Admin Check: If you are your organization's only admin and other users remain, deletion is blocked until another user is made an Admin
- Only User: If you are the only user left in your organization, deleting your account also deletes the organization and all of its data
Account Status Messages:
- "Your account owns or has shared workflows and can't be deleted": Appears when deletion is blocked
- "Ask an admin to reassign them, or disable your account instead": Explains the alternative
- "This will permanently delete your account. Enter your password to confirm.": Shown when deletion is allowed
- "Please make another user an Admin before deleting your account": Appears when you are the last admin and other users remain
Conclusion
The DataDios User Profile management system provides a comprehensive and secure way for users to manage their account information, preferences, and security settings. With features like configuration management, password changes, and account protection, users have full control over their DataDios experience while maintaining security and data integrity.
The interface is designed for ease of use while providing powerful functionality for account management. Regular use of these features ensures optimal user experience and account security within the DataDios platform.