Datasources & Operations
This document explains how to create, update, test, clone, and delete datasources in DataDios.
Quick Start
Key Actions You Can Perform
- Create a New Datasource
- Test the Connection and Save the Datasource
- Update Datasource Details
- Clone a Datasource
- Delete a Datasource
- Import Datasource from JSON
- Refresh the Object List
Datasource Creation and Connection Parameters Validation
-
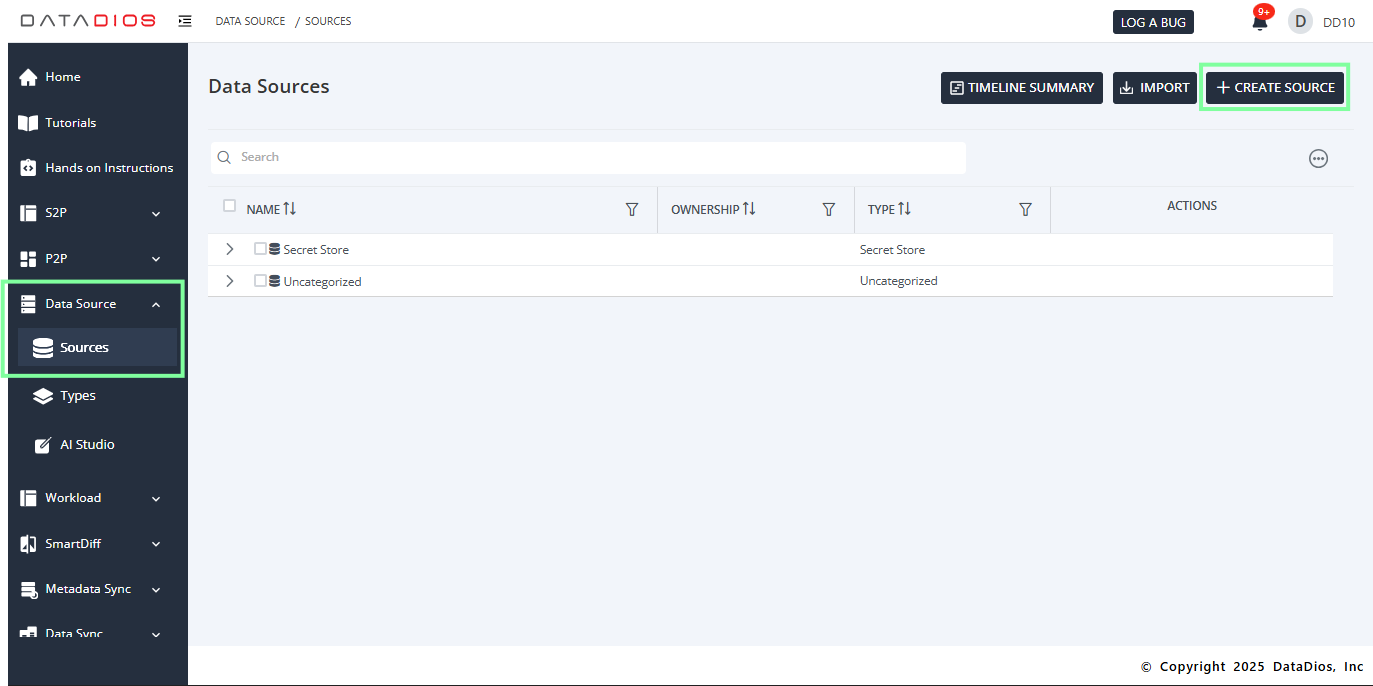
Navigate to the Datasources tab in DataDios and click on Create DS.
-
Choose your preferred Datasource Type from the list.
- Click on your datasource type for which you want to create, or search for it.
-
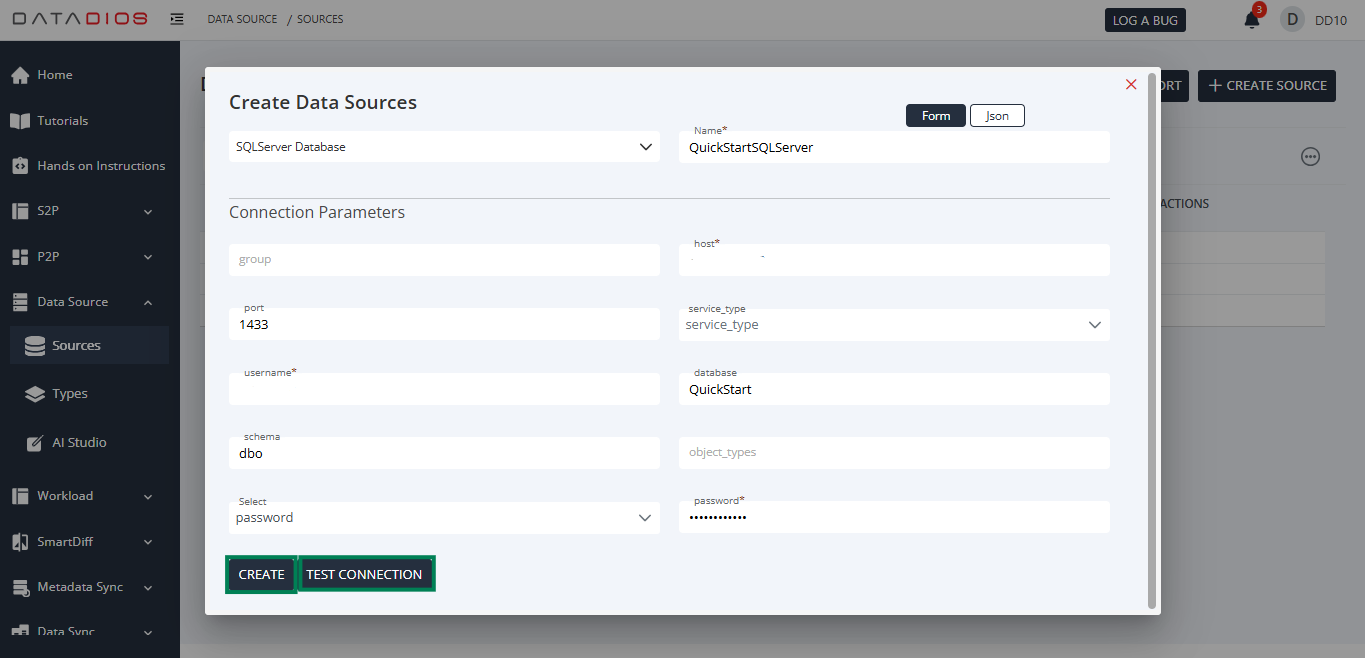
Fill in the Connection Details in the credentials form that appears.
-
Alternatively, you can provide the datasource details in JSON format.
-
JSON Format for Datasources
- Example below is for PostgreSQL. Please update credentials before using.
 {
    "host":"localhost",
    "port":"5432",
    "username":"postgres",
    "database":"quickstart",
    "schema":"",
    "object_types":"",
    "schedule_sync":"",
    "password":"your-password",
    "secret_name":""
 }
-
-
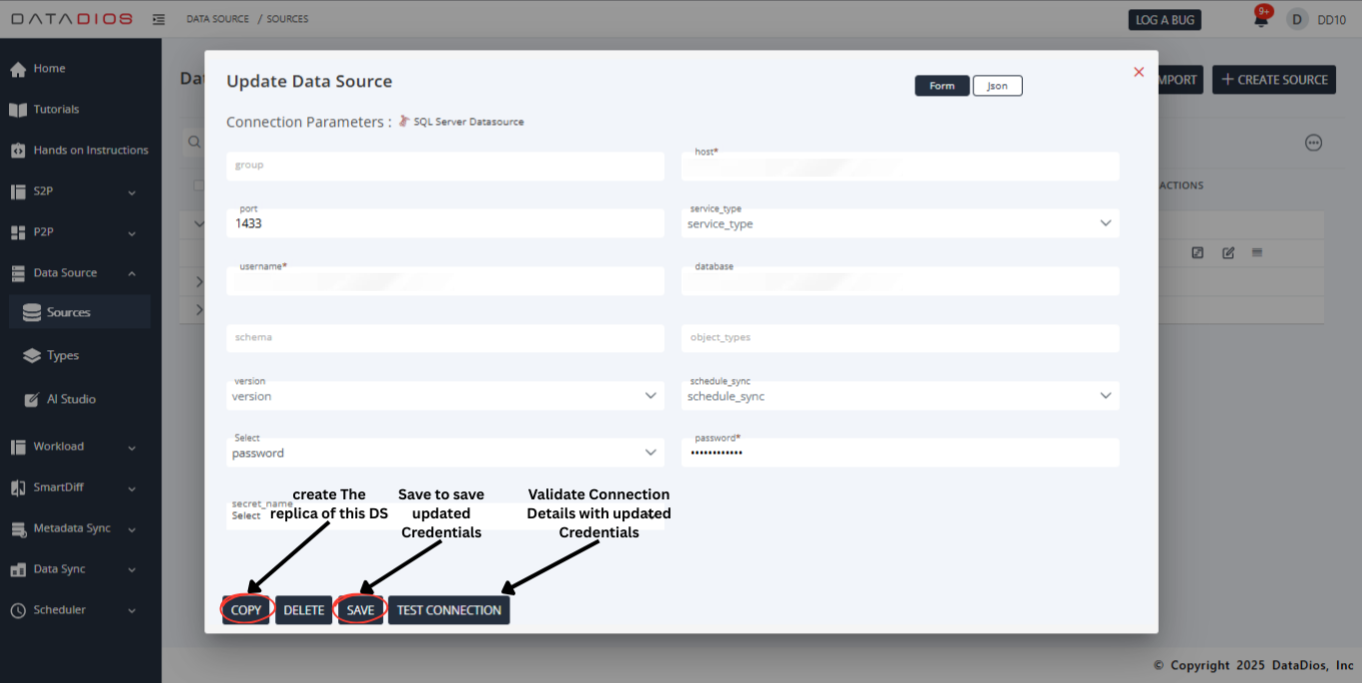
Once the details are entered, click Test to validate the connection.
-
After successful validation, click Create to save the datasource.
- This will redirect you to the datasource listing page, where your newly created datasource will appear.
Update Datasource Details
-
Go to the Datasources tab and locate your datasource in the listing.
-
Click on the Edit Icon to edit the datasource details.
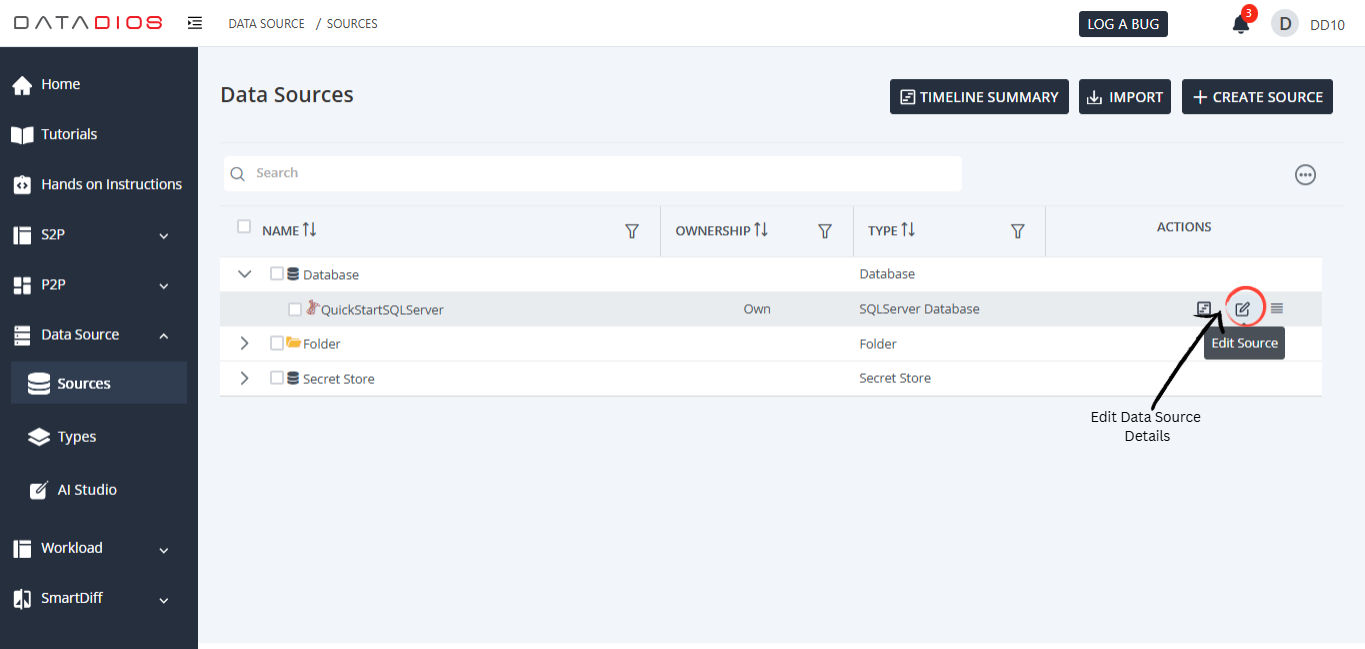
For source types that support indexing, the edit panel also carries a RAG settings tab — see RAG Settings.
-
Update the connection details (credentials, parameters, etc.) as needed.
-
Validate the updated connection and click Save.
Import Datasource
- Datasource import is simply datasource creation when you are sure about the datasource credentials.
- This will create the datasource directly in DataDios.
- After import, you can validate your datasource by clicking on the edit panel and test-connection.
- To import a datasource, click on the import button and select your JSON file containing datasource details.
- You can import multiple datasources at the same time.
- JSON Structure
[
    {
       "Name": "Datasource_Name",
       "Type": "SQLServer Database",
       "Connection Parameters": [
             {
                "host": "host-address",
                "port": "1433",
                "username": "db-username",
                "password": "db-password",
                "database": "db-to-connect",
                "schema": "schema-to-connect",
                "object_types": "tables,views"
             }
       ]
    }
 ]
Clone a Datasource
- Go to the Datasources tab and locate your datasource in the listing.
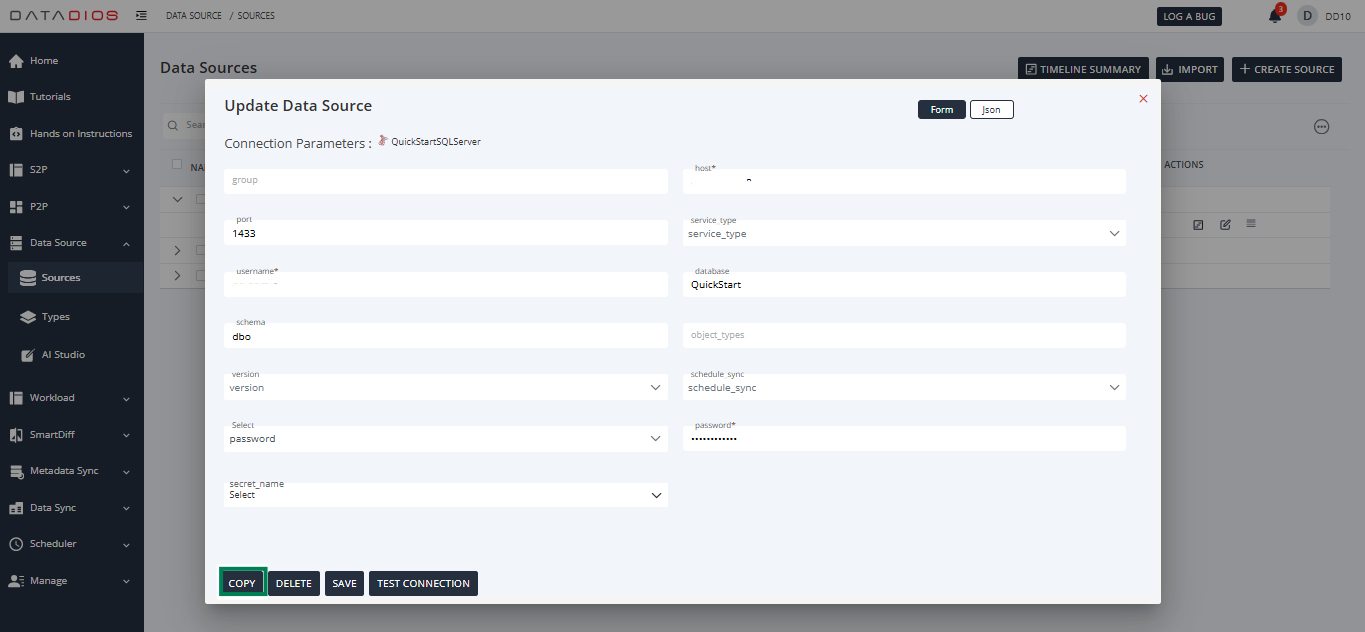
- Click on the Edit Icon on the right side of the datasource name to edit the datasource details.
- To clone the datasource, click on Copy in the Datasource Edit Details Panel.
- Cloning follows the same process as datasource creation and will create a copy.
- Open the datasource details, adjust the parameters as required, and save.
- Ensure you update credentials and connection parameters correctly to avoid conflicts.
Delete a Datasource
There are two ways to delete a datasource in DataDios:
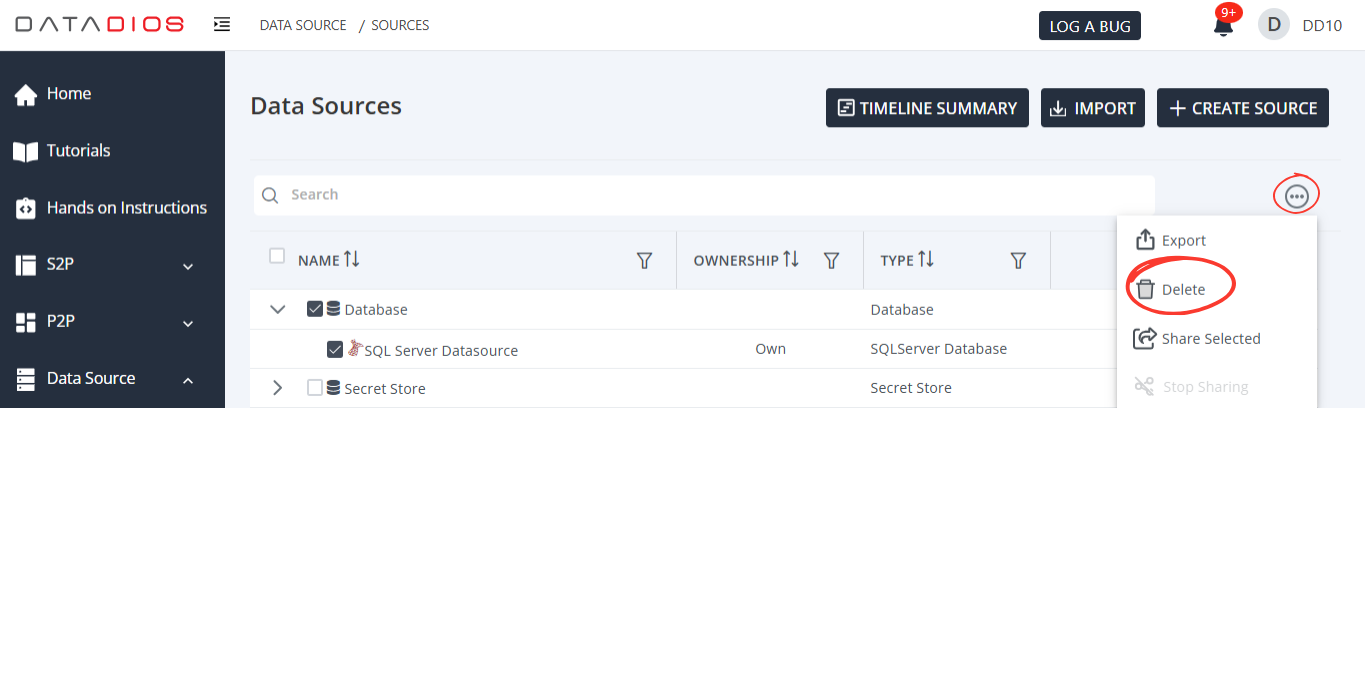
1. Delete from the Datasource List
-
Locate the datasource in the listing.
-
Click on the Options menu (top-right of the datasource card).
-
Select Delete.
-
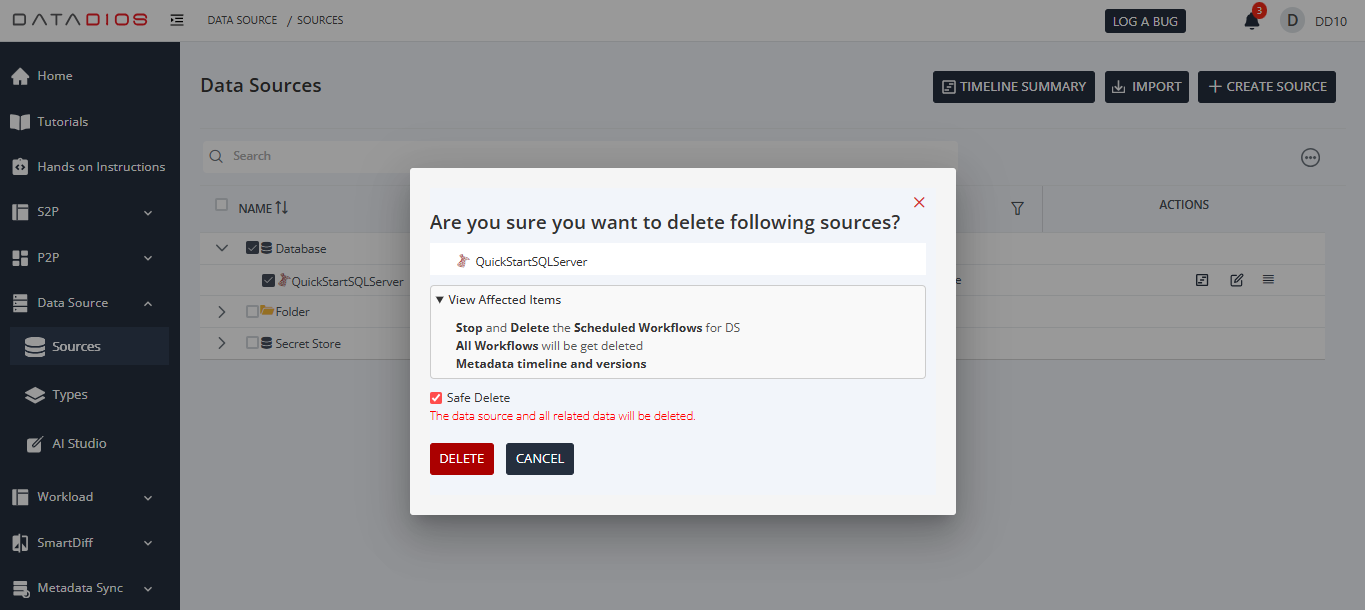
Choose an appropriate deletion action:
- Safe Delete
- Removes all data associated with the selected datasource.
- Requires you to confirm the action by selecting the checkbox.
- Delete Operation
- Removes only dependent data related to the datasource.
- Useful if you want to retain partial or linked information.
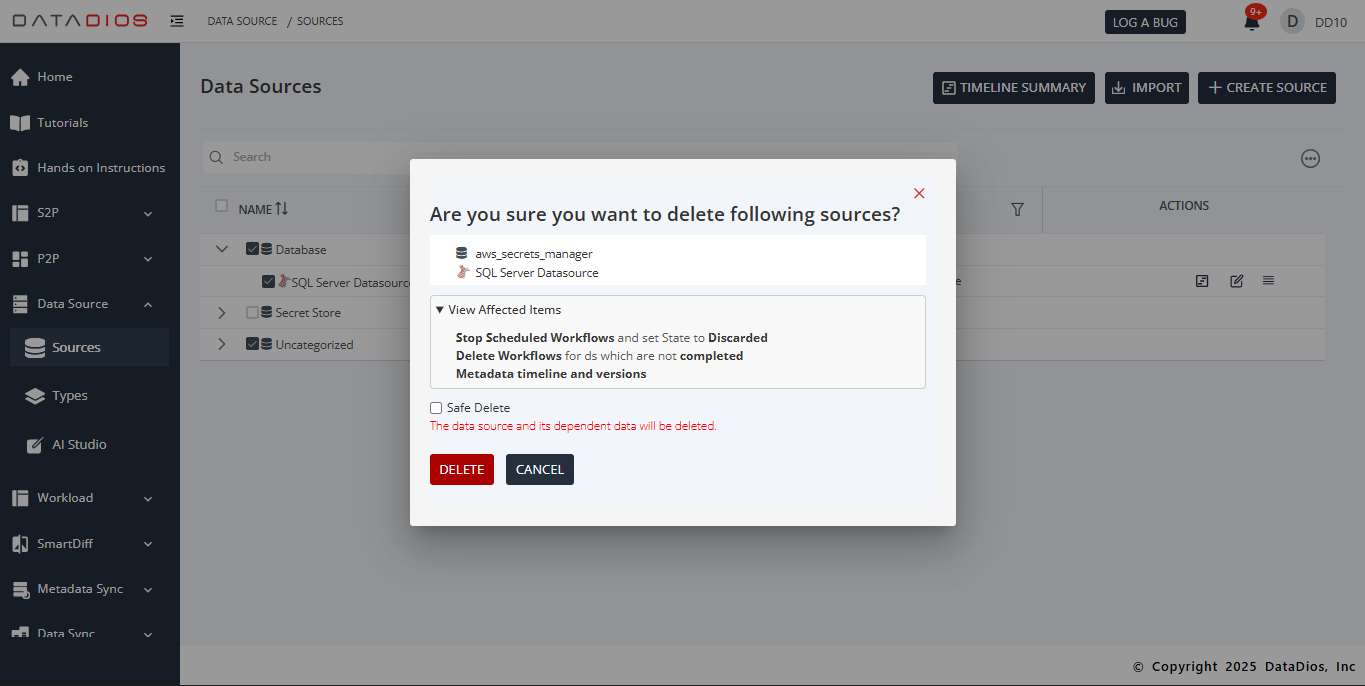
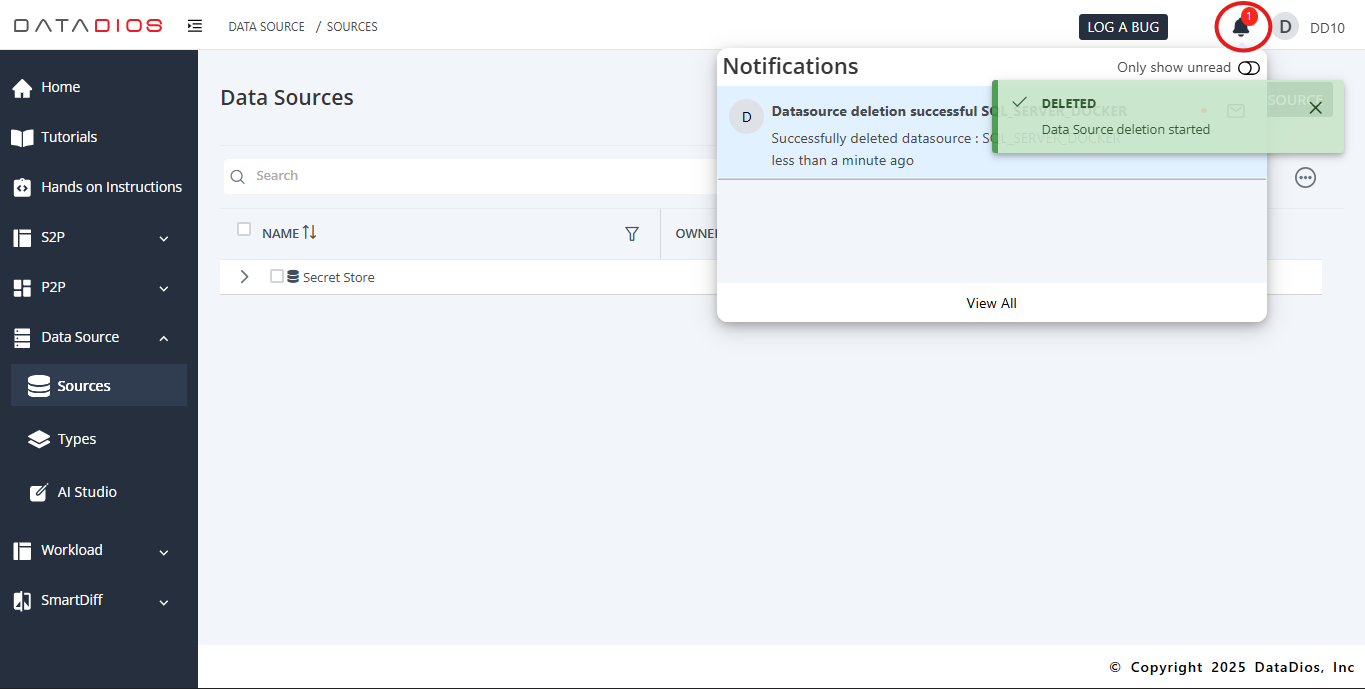
- Click on Delete Operation and this will delete the datasource and trigger an alert indicating that the datasource and its data have been deleted.
- Safe Delete
2. Delete from the Edit Datasource Details Panel
- Open the datasource details form.
- Use the Delete option available in the panel.
- This will also follow the same operations.
If RAG is enabled for the data source, deleting it also deletes its knowledge base: RAG is turned off, its auto-sync schedule stops, and its embedded documents are removed. Registering a data source under the same name later starts a new, empty knowledge base.
Alert After Datasource Deletion
Explore Datasources
On the Data Management page, open a datasource from the Sources list once it finishes syncing to browse its objects — databases, schemas, tables, views, and files — as a tree you can drill into. Open a table or view to see its columns on the Metadata tab.
To find a specific object, use the search box above the object list:
- It appears as soon as you open the datasource and stays available as you drill down through databases and schemas — but not once you open an object itself, or on the datasource's other tabs (like Schema Drift).
- The search covers the whole datasource, not just the level you are currently viewing, so an object nested several levels deep still turns up in the results.
- Each result shows the object that contains it — for a table, the database and schema joined by a colon (for example
quickstart:public). - Column filters and sorting are turned off while a search term is active. Clear the box to bring them back — except on a level with more than 50 objects, where they stay off either way.
- Selecting a result opens that object directly and clears the search box, so type the term again if you want to see the rest of the matches. Because a result is reached by search rather than by walking the tree, the breadcrumb shows datasource › object — use it to jump back to the datasource, then drill in normally if you need the levels in between.
- A search-hit link only works for the session that opened it, so it is not shareable — reloading the page or opening a copied link to a search result shows an error instead of the object.
Refreshing the Object List
The object list can fall behind the actual database as tables, schemas, or files change. Click Refresh above the object list to start a background job that re-reads the datasource's objects and rebuilds the list.
- While the job is running, the button label shows Loading… X% · Y ago — X% is the job's reported progress, and "Y ago" is how long since the job last reported that progress (not since it started).
- Hovering the button while a refresh is running shows Refresh list items (last reported Y ago). Once the refresh completes, it shows Refresh list items (last refreshed Y ago) — the time since the job finished.
- If the job makes no progress for about a minute before reaching 10%, DataDios assumes the source may be offline, stops polling, and prompts you to refresh again.
- Past 10% there is no automatic timeout — a job stuck partway through and a healthy slow one look the same in the UI. A "· Y ago" value that keeps growing while the percentage stays put is the only sign the refresh may not be progressing.
For detailed steps on creating and testing specific datasources, check out the following: