SharePoint (Knowledge Base)
This section explains how to connect SharePoint Online as a Knowledge Base data source in DataDios. It is a read-only connector: you browse a site's document libraries, folders, and files, and the platform ingests file content into RAG so it is searchable through Hybrid Search.
The connector targets SharePoint Online (not SharePoint Server / on-prem) and reads document-library files — Word, PDF, PowerPoint, and similar. Site Pages and Lists are not ingested.
Prerequisites
SharePoint is authenticated app-only through Azure AD (Microsoft Entra ID) client credentials and the Microsoft Graph API. Register an app once in the Azure portal:
- Register an application (Microsoft Entra ID → App registrations → New registration). Note its Application (client) ID and Directory (tenant) ID.
- Add a client secret (Certificates & secrets → New client secret) and copy its value.
- Grant the
Sites.Read.Allapplication permission (API permissions → Add a permission → Microsoft Graph → Application permissions →Sites.Read.All), then click Grant admin consent.
You'll also need the site URL of the SharePoint site whose libraries you want to read, e.g. https://contoso.sharepoint.com/sites/Engineering.
Steps to Create and Test a SharePoint Data Source
Step 1: Create a Data Source
- Navigate to Data Explorer from the left navigation menu.
- Click + Add connection in the top-right corner. The Create data source dialog opens.
- Under Identity, enter a Name for the connection and select SharePoint from the searchable Type dropdown — it is listed under the Knowledge Base group.
Step 2: Fill Connection Details
In the Connection Parameters section, provide:
- Site URL: the SharePoint site URL, e.g.
https://contoso.sharepoint.com/sites/Engineering(required) - Tenant ID: your Azure AD Directory (tenant) ID (required)
- Client ID: the registered app's Application (client) ID (required)
- Select Secret Source / Password: the app's client secret. Choose Direct Input to type the secret here, or From Secret Store to reference a configured secret store
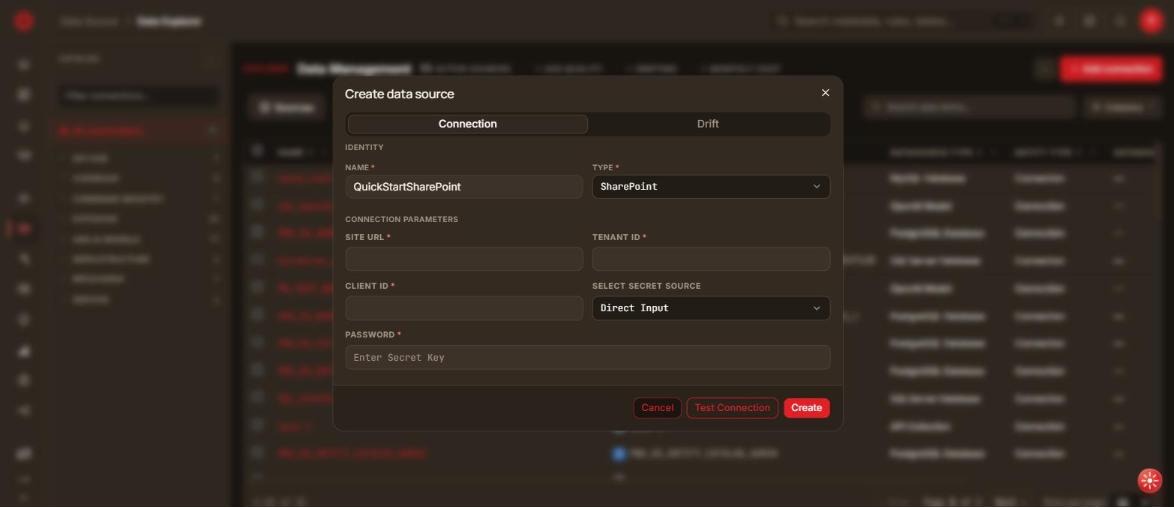
Alongside Connection the dialog carries a Drift tab, where Enable drift tracking records changes to the source in the drift timeline. SharePoint has no Lineage, Workload or Profiling tab.
Step 3: Test Connection
Click Test Connection. Correct credentials with admin consent resolve the site before you save; the client secret is never echoed back in any response or log.
If the test fails, verify the Sites.Read.All permission has admin consent granted and that the site URL points to an existing site.
Step 4: Save Data Source
Click Create. You land back on the Sources list, with the new connection grouped under Knowledge Base in the left Catalog panel.
To change it later, click the Edit connection (pencil) icon on its row and save with Save instead of Create.
Step 5: Browse and Search
Click the connection's name to drill into it and browse the site's document libraries → folders → files — the same explorer shell as every other connection type.
Document-library files are ingested into RAG and become searchable through Hybrid Search.